Difference between revisions of "How to Make a New Content Module"
PeterRobert (talk | contribs) |
PeterRobert (talk | contribs) |
||
| Line 11: | Line 11: | ||
In this example a new footer content module is made to show a link to the new information page that was made here - <big>'''[[How to Make a New Page]]'''</big> | In this example a new footer content module is made to show a link to the new information page that was made here - <big>'''[[How to Make a New Page]]'''</big> | ||
| − | This new module is made by cloning the existing '''cm_footer_information_links''' module which performs a similar function to make a ''' | + | This new module is made by cloning the existing '''cm_footer_information_links''' module which performs a similar function to make a '''cm_footer_about_links''' module |
The module has a main file, a template file and a language file so a clone is made of each. | The module has a main file, a template file and a language file so a clone is made of each. | ||
| Line 29: | Line 29: | ||
</div> | </div> | ||
*There are 19 references shown. | *There are 19 references shown. | ||
| − | *Change every instance of '''information''' to the new file name ''' | + | *Change every instance of '''information''' to the new file name '''about''' (used here as an example) ensuring the same text case is used e.g. replace '''information''' with '''about''' and '''INFORMATION''' with '''ABOUT'''. |
*In the file editor menu, go to and click '''File → Save as...''' | *In the file editor menu, go to and click '''File → Save as...''' | ||
| − | *Enter the new file name (''' | + | *Enter the new file name ('''cm_footer_about_links''') and click '''Save''' |
---- | ---- | ||
| Line 46: | Line 46: | ||
</div> | </div> | ||
*There are 3 references shown. | *There are 3 references shown. | ||
| − | *Change every instance of '''information''' to the new file name ''' | + | *Change every instance of '''information''' to the new file name '''about''' (used here as an example) ensuring the same text case is used e.g. replace '''information''' with '''about''' and '''INFORMATION''' with '''ABOUT'''. |
*In the file editor menu, go to and click '''File → Save as...''' | *In the file editor menu, go to and click '''File → Save as...''' | ||
| − | *Enter the new file name (''' | + | *Enter the new file name ('''tpl_cm_footer_about_links''') and click '''Save''' |
---- | ---- | ||
| Line 63: | Line 63: | ||
</div> | </div> | ||
*There are 7 references shown. | *There are 7 references shown. | ||
| − | *Change every instance of '''information''' to the new file name ''' | + | *Change every instance of '''information''' to the new file name '''about''' (used here as an example) ensuring the same text case is used e.g. replace '''information''' with '''about''' and '''INFORMATION''' with '''ABOUT'''. |
*Delete the following lines (lines 23, 24, and 25 in the example) | *Delete the following lines (lines 23, 24, and 25 in the example) | ||
'privacy.php' => 'Privacy & Cookie Policy', | 'privacy.php' => 'Privacy & Cookie Policy', | ||
| Line 72: | Line 72: | ||
'contact_us.php' => 'Contact Us' | 'contact_us.php' => 'Contact Us' | ||
to | to | ||
| − | ' | + | 'about.php' => 'About' |
*In the file editor menu, go to and click '''File → Save as...''' | *In the file editor menu, go to and click '''File → Save as...''' | ||
| − | *Enter the new file name (''' | + | *Enter the new file name ('''cm_footer_about_links''') and click '''Save''' |
---- | ---- | ||
| Line 80: | Line 80: | ||
*From admin go to '''Modules → Content''' | *From admin go to '''Modules → Content''' | ||
*Click Install Module | *Click Install Module | ||
| − | *Find and click ''' | + | *Find and click '''About Links Block''' |
*Click Install Module | *Click Install Module | ||
| − | * | + | *Click edit |
| + | *Set the Content Width and Sort Order as required. | ||
Revision as of 17:59, 27 November 2019
<historylink type="back">🠈 Back</historylink> 🠉 FAQS TIPS & TRICKS
It is a common requirement for shop owners to want additional content modules specific to their shop e.g. an additional navbar or footer content module to link to new information pages.
This is easily achieved by making a clone of an existing module that already performs a similar function.
The same process can be applied similarly to any module if required, not only navbar and footer modules.
In this example a new footer content module is made to show a link to the new information page that was made here - How to Make a New Page
This new module is made by cloning the existing cm_footer_information_links module which performs a similar function to make a cm_footer_about_links module
The module has a main file, a template file and a language file so a clone is made of each.
Main File
- On your local computer, find and open the downloaded and unzipped (extracted) CE Phoenix folder or download and unzip a new one.
- Go to includes → modules → content → footer
- Find the cm_footer_information_links file.
- Open the file in a file editor.
- In the file editor menu, go to Edit → Find to open the input box.
- All references to the old file name information must be changed so enter information in the input box to see this:

- There are 19 references shown.
- Change every instance of information to the new file name about (used here as an example) ensuring the same text case is used e.g. replace information with about and INFORMATION with ABOUT.
- In the file editor menu, go to and click File → Save as...
- Enter the new file name (cm_footer_about_links) and click Save
Template File
- Now back in the downloaded and unzipped (extracted) CE Phoenix folder.
- Go to includes → modules → content → footer → templates
- Find the tpl_cm_footer_information_links file.
- Open the file in a file editor.
- In the file editor menu, go to Edit → Find to open the input box.
- All references to the old file name information must be changed so enter information in the input box to see this:
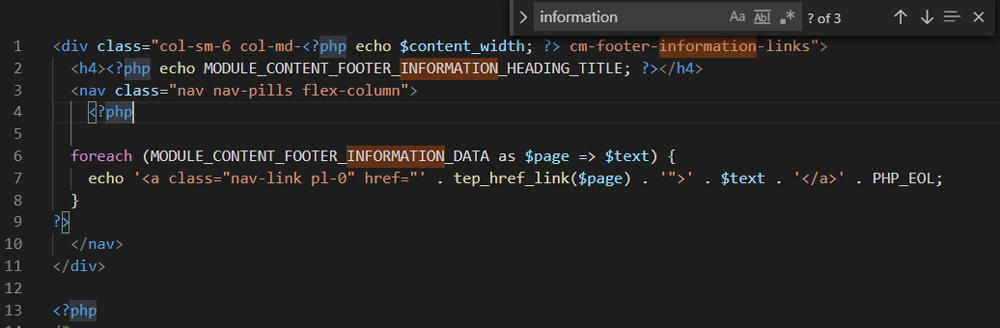
- There are 3 references shown.
- Change every instance of information to the new file name about (used here as an example) ensuring the same text case is used e.g. replace information with about and INFORMATION with ABOUT.
- In the file editor menu, go to and click File → Save as...
- Enter the new file name (tpl_cm_footer_about_links) and click Save
Language File
- Now back in the downloaded and unzipped (extracted) CE Phoenix folder.
- Go to includes → languages → english → modules → content → footer
- Find the cm_footer_information_links file.
- Open the file in a file editor.
- In the file editor menu, go to Edit → Find to open the input box.
- All references to the old file name information must be changed so enter information in the input box to see this:
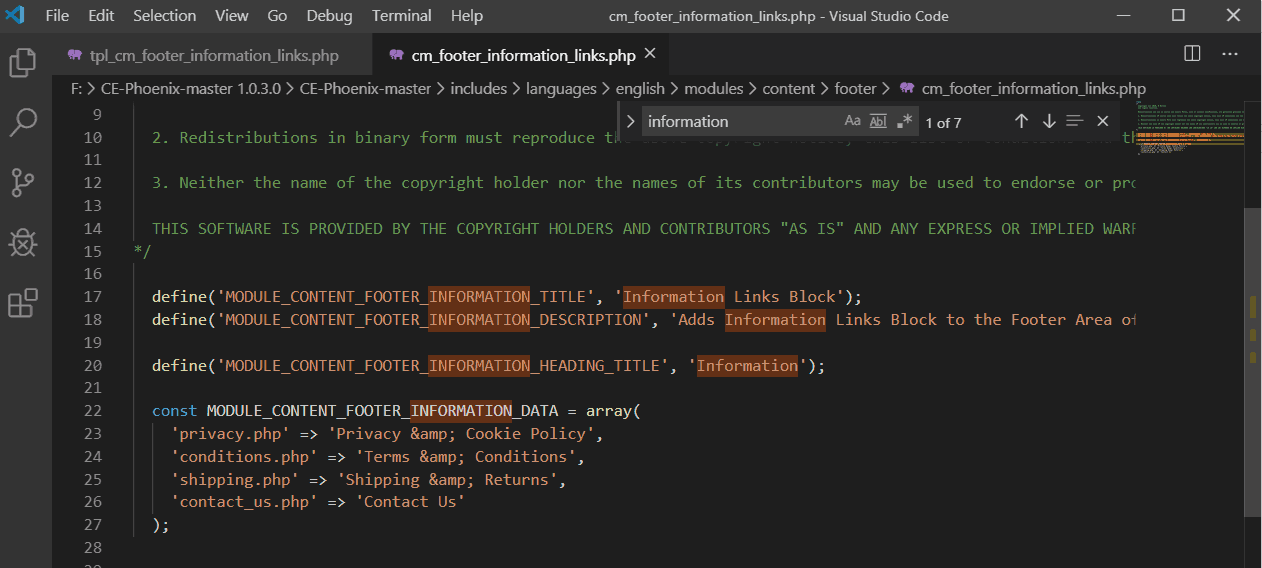
- There are 7 references shown.
- Change every instance of information to the new file name about (used here as an example) ensuring the same text case is used e.g. replace information with about and INFORMATION with ABOUT.
- Delete the following lines (lines 23, 24, and 25 in the example)
'privacy.php' => 'Privacy & Cookie Policy',
'conditions.php' => 'Terms & Conditions',
'shipping.php' => 'Shipping & Returns',
- Change the line (line 26 in the example)
'contact_us.php' => 'Contact Us'
to
'about.php' => 'About'
- In the file editor menu, go to and click File → Save as...
- Enter the new file name (cm_footer_about_links) and click Save
- Using FTP software, upload the new files to the host server - ensure they are uploaded to the correct locations.
- From admin go to Modules → Content
- Click Install Module
- Find and click About Links Block
- Click Install Module
- Click edit
- Set the Content Width and Sort Order as required.

Please visit again soon for additions and changes
Phoenix Cart User Guide, like CE Phoenix Cart, is free to use but is maintained by unpaid volunteers.
All other content is the reserved Intellectual Property and Copyright of phoenixcart.org
