Difference between revisions of "Queued Emails"
PeterRobert (talk | contribs) |
PeterRobert (talk | contribs) |
||
| Line 3: | Line 3: | ||
<big>Coming soon to a Phoenix Cart near you!!</big> | <big>Coming soon to a Phoenix Cart near you!!</big> | ||
| − | Phoenix Cart’s Queued E-mails is a powerful and amazing feature, unique to Phoenix Cart, that automates customer engagement effortlessly, so helping store-owners to grow their online business. | + | Phoenix Cart’s Queued E-mails system is a powerful and amazing feature, unique to Phoenix Cart, that automates customer engagement effortlessly, so helping store-owners to grow their online business. |
We're not aware of anything like it available in any other free e-commerce software. | We're not aware of anything like it available in any other free e-commerce software. | ||
| − | This system adds preconfigured e-mails, complete with relevant data, to a queue and schedules a send date/time, all automatically! | + | This system adds preconfigured e-mails, complete with relevant customer specific data, to a queue and schedules a send date/time, all automatically! |
E-mails and scheduled send date/times are based on customer actions — or inactions — requiring no ongoing input from the store owner. | E-mails and scheduled send date/times are based on customer actions — or inactions — requiring no ongoing input from the store owner. | ||
Revision as of 10:09, 24 August 2024
Coming soon to a Phoenix Cart near you!!
Phoenix Cart’s Queued E-mails system is a powerful and amazing feature, unique to Phoenix Cart, that automates customer engagement effortlessly, so helping store-owners to grow their online business.
We're not aware of anything like it available in any other free e-commerce software.
This system adds preconfigured e-mails, complete with relevant customer specific data, to a queue and schedules a send date/time, all automatically!
E-mails and scheduled send date/times are based on customer actions — or inactions — requiring no ongoing input from the store owner.
Once set up, it’s virtually 'Set & Forget,' giving seamless automation and saving valuable time while keeping full control in the hands of the store owner.
All that is required from the store owner is to click one button to send all e-mails in the queue that are scheduled to go.
From admin go to  Queued E-mails
See the dropdown menu showing Queue and Templates.
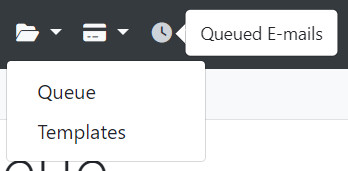
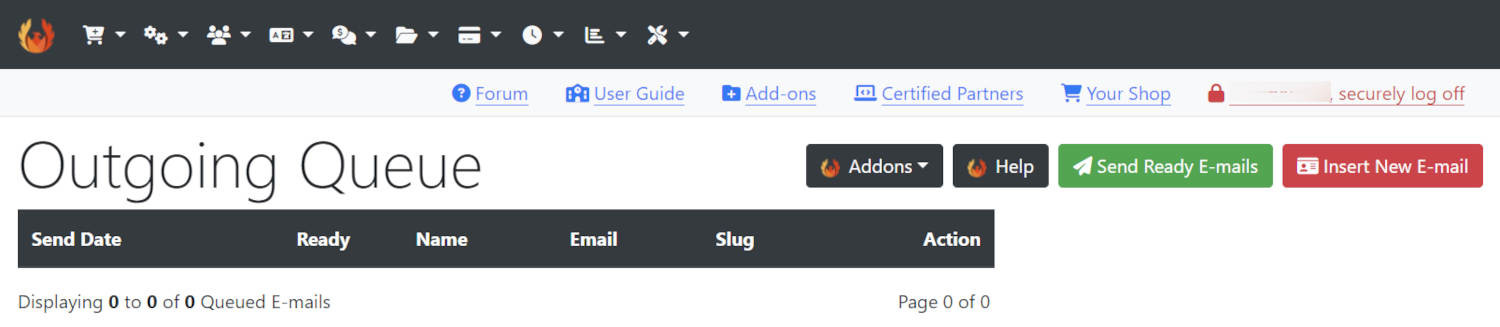
Click Queue to go to Outgoing Queue page.
On a new installation with no Customers or Orders yet, see this:
Click Templates to go to Outgoing E-mail Templates page to see this:

There are 3 Scheduler Modules and their associated E-mail Templates built into Phoenix Cart and ready to use.
no_checkout
If a customer registers but does not checkout, this e-mail will be added to the Outgoing Queue.
The e-mail will be scheduled to send 10 days after registration if the customer does not check out during that time.
It will be be removed from the Outgoing Queue when it is sent or if the customer checks out during that time.
order_thanks
When a customer checks out, this e-mail will be added to the Outgoing Queue.
The e-mail will be scheduled to send 4 hours after checkout.
It will be be removed from the Outgoing Queue when it is sent.
winback
When a customer checks out, this e-mail will be added to the Outgoing Queue.
The e-mail will be scheduled to send 90 days after checkout if the customer has not signed in during that period.
It will be be removed from the Outgoing Queue when it is sent or if the customer signs in during that period when a new e-mail will be added to the Outgoing Queue and scheduled.
More Scheduler Modules are available in the Phoenix Cart Addons Library - click the Addons button at the top of the page.
Preview E-mail Templates.
Click on a Template in the table to select it.
To preview the e-mail template, click View This E-mail
This will display the preview in a pop-up, for order_thanks as an example, you will see this:
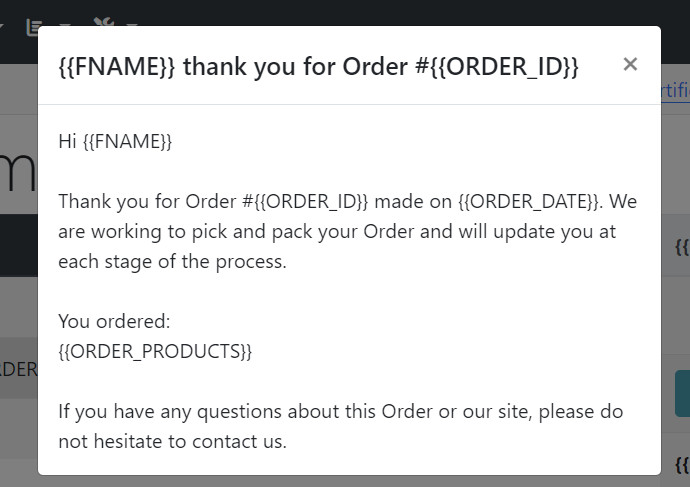
Notice that within the text, there are {{MERGE_TAGS}} which will insert relevant data into the e-mail.
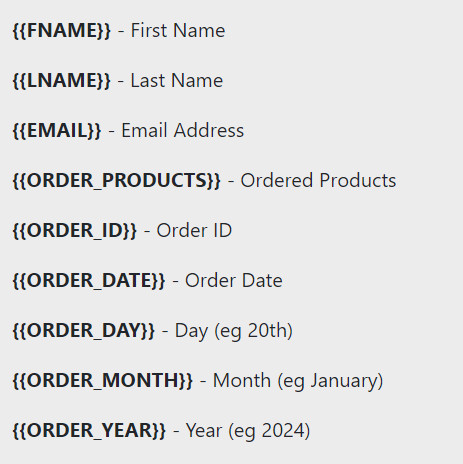
Note the helpful list of merge tags relevant to the e-mail and what data they will insert.
For order_thanks as an example, you will see this:
Edit E-mail Templates.
Click on a Template in the table to select it.
To edit the e-mail, click Edit
Make changes to Email Title and Email Text as required and click Save
Delete should only be used to remove/disable the e-mail.
Insert New E-mail Template should only be used if instructed when installing a new Scheduler Module.
Example of Queued E-mails System in Action
A customer registers on the website but does not checkout.
Go to Queued E-mails → Queue to see this:

The no_checkout e-mail has been added to the queue and scheduled to send in 10 days.
The Ready indicator initially shows RED but will change to GREEN when the scheduled date/time has been reached.
Clicking the Send Ready E-mails button at any time will send all e-mails in the queue that have reached their scheduled date/time when they will then be removed from the queue.
The same customer then checks out a few hours after registration.
Go to Queued E-mails → Queue to now see this:
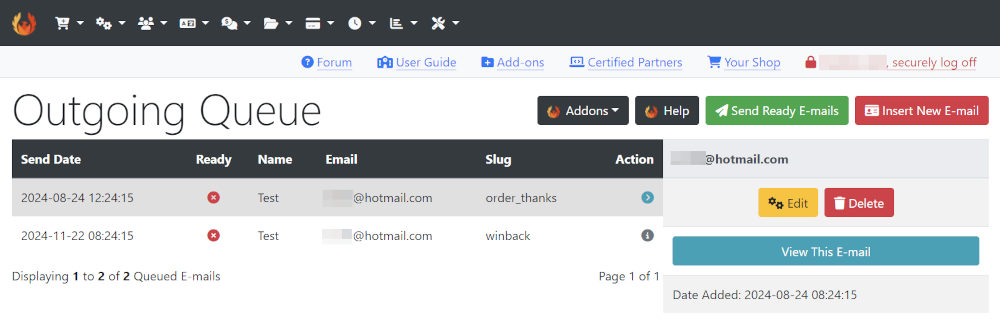
The no_checkout e-mail has been removed from the queue.
The order_thanks e-mail has been added to the queue and scheduled to send in 4 hours.
The winback e-mail has been added to the queue and scheduled to send in 90 days.
The e-mails, as they will be received by the customer, can be previewed in a pop-up by clicking View This E-mail
Changing the Scheduled Send Date/Time
The scheduled date/time to send each e-mail is configured in each Scheduler Module file.
The default scheduled date/times have been carefully chosen to suit most use cases but the configuration can be changed in the file if desired.
Use your host server Control Panel or FTP software to find and edit files.
These files will be found in the /includes/modules/outgoing/ folder/directory.
For example, the file for no_checkout is /includes/modules/outgoing/no_checkout.php
The scheduled date/time is configured in this line found near the top of the file:
const INTERVAL = 'P10D';
This means it is set for 10 Days.
Changing P10D to P5D would set it to 5 Days.
Changing it to P3W would set it to 3 Weeks. Changing it to P21D, that is, 21 Days would also set it to 3 Weeks.
Changing it to P2M would set it to 2 Months.
Changing it to P1Y would set it to 2 Weeks.
For another example, the file for order_thanks is /includes/modules/outgoing/order_thanks.php
The scheduled date/time is configured in this line found near the top of the file:
const INTERVAL = 'PT4H';
This means it is set for 4 Hours. Note the additional T for Time that must precede settings for Hours, Minutes and Seconds.
Changing PT4H to PT8H would set it to 8 Hours.
Changing it to PT30M would set it to 30 Minutes.
Changing it to PT45S would set it to 45 Seconds.
The configuration can be as complex as required.
For example, P1Y3M2W5DT4H15M would set to 1 Year 3 Months 2 Weeks 5 Days 4 Hours 15 Minutes
Note the additional T for Time that must precede settings for Hours, Minutes and Seconds.

Please visit again soon for additions and changes
Phoenix Cart User Guide, like CE Phoenix Cart, is free to use but is maintained by unpaid volunteers.
All other content is the reserved Intellectual Property and Copyright of phoenixcart.org
