Difference between revisions of "Download"
PeterRobert (talk | contribs) |
PeterRobert (talk | contribs) |
||
| (30 intermediate revisions by the same user not shown) | |||
| Line 1: | Line 1: | ||
| − | < | + | <div class="btn btn-grey btn-back">{{#fas:arrow-left}} Back</div> <div class="btn btn-grey btn-admin">{{#fas:cog}} Administration</div> |
| − | < | ||
<hr> | <hr> | ||
| − | From admin go to '''Configuration → Download''' to see this: | + | __TOC__ |
| + | __FORCETOC__ | ||
| + | From admin go to [[File:adminnavbarconfig.png|link=]] '''Configuration → Download''' to see this: | ||
<div class="mainpage_box"> | <div class="mainpage_box"> | ||
| − | [[File:download. | + | [[File:download.jpg|link=|1500px]] |
</div> | </div> | ||
| − | This enables the | + | This enables the store to sell downloadable files also known as virtual products. |
| + | |||
| + | Everything is set, ready to go, edit only if required. | ||
| + | |||
| + | There is an example of this shown in the '''[https://phoenixcart.org/demo/product_info.php?cPath=1_3&sort=1a&products_id=7 CE Phoenix Cart Store Demo]'''. | ||
| + | |||
| + | It can also be seen how that was set up in the '''[https://phoenixcart.org/demoadmin/admin/products_attributes.php CE Phoenix Cart Admin Demo]'''. | ||
| + | |||
---- | ---- | ||
| − | ''' | + | ==='''Downloadable File'''=== |
| − | * | + | |
| − | * | + | *Create the downloadable file, name it using lowercase and no spaces. |
| − | * | + | *Upload the file to the '''download''' folder/directory on the host server. |
| − | + | *The setting '''Download by redirect''' passes the file from the '''download''' folder/directory to the '''pub''' folder/directory so it can be downloaded but adds a random folder name so it can not be found by public search. | |
| + | |||
| + | |||
---- | ---- | ||
| − | ''' | + | ==='''Downloadable Product'''=== |
| − | * | + | ===='''Create Product'''==== |
| − | *Click | + | *Create the new product in your shop in '''Catalog → Categories/Products''' - see '''[[Categories/Products]]''' |
| − | * | + | *Ensure to set the '''Products Weight''' to '''0''' |
| − | *Click <span | + | |
| + | ===='''Product Attributes'''==== | ||
| + | *Go to '''Catalog → Products Attributes''' | ||
| + | *Click <span class="btn-info">Options</span> button to see like this: | ||
| + | |||
| + | <div class="mainpage_box"> | ||
| + | [[File:options-download.jpg|link=|1500px]] | ||
| + | </div> | ||
| + | |||
| + | *Enter a new '''Option Name''', for example, '''Download'''. | ||
| + | *Enter a '''Sort Order'''. | ||
| + | *Click <span style="color:green">'''<big>+</big>'''</span> to save. | ||
| + | |||
---- | ---- | ||
| − | ''' | + | |
| − | * | + | |
| − | * | + | *Click <span class="btn-info">Values</span> button to see like this: |
| − | + | ||
| − | *Click <span | + | <div class="mainpage_box"> |
| + | [[File:values-download.jpg|link=|1500px]] | ||
| + | </div> | ||
| + | |||
| + | *Choose the '''Option Name''' from the pull down menu, for example, '''Download'''. | ||
| + | *Enter an '''Option Value''' in the input box, for example, '''PDF'''. | ||
| + | *Enter a '''Sort Order'''. | ||
| + | *Click <span style="color:green">'''<big>+</big>'''</span> to save. | ||
| + | *Repeat to assign additional Option Values to Option Names, for example, if you have optional downloadable file types. | ||
| + | |||
---- | ---- | ||
| − | ''' | + | |
| − | * | + | |
| − | * | + | *Click <span class="btn-info">Attributes</span> button to see like this: |
| − | * | + | |
| − | *Click <span | + | <div class="mainpage_box"> |
| + | [[File:attributes-download.jpg|link=|1500px]] | ||
| + | </div> | ||
| + | |||
| + | *Choose the '''Product Name''' from the pull down menu. | ||
| + | *Choose the '''Option Name''' from the pull down menu, in this example, '''Download'''. | ||
| + | *Choose the '''Option Value''' from the pull down menu, in this example, '''PDF'''. | ||
| + | *Enter a net price adjustment in the '''Value Price''' input box if required. | ||
| + | *Enter a + or - prefix in the '''Prefix''' input box to add or subtract the price adjustment from the product price. | ||
| + | *Enter the exact file name of the downloadable file, including the file extension, for example '''.pdf''' in the '''Filename:''' input box. | ||
| + | *The '''Expiry delay (days)''' and '''Maximum number of downloads''' can be changed from the defaults already set if required. | ||
| + | *Click <span style="color:green">'''<big>+</big>'''</span> to save. | ||
| + | *Repeat for each Option Name and Option Value you wish to apply to the product. | ||
| + | |||
| + | |||
---- | ---- | ||
| − | + | ==='''Customer Experience'''=== | |
| − | + | ||
| − | + | When a customer checks out and pays on the store, the order status is then set to '''Pending''' by default. | |
| − | + | ||
| − | + | The customer will not be able to download the product. This prevents them getting the download for free in case one of your payment options is by deferred payment, for example, by cheque or bank payment. | |
| − | + | ||
| − | + | When the store owner changes the order status to '''Processing''' or '''Delivered''', the link to download the product will then appear in the customer's order, in their order history, in their profile, when they are logged in on the store. | |
| − | + | ||
| − | + | It appears like this: | |
| − | + | ||
| − | |||
| − | |||
| − | |||
| − | |||
<div class="mainpage_box"> | <div class="mainpage_box"> | ||
| − | [[File: | + | [[File:customer-download.jpg|link=|1500px]] |
</div> | </div> | ||
| − | + | ||
| − | + | This link will stay there for the '''Expiry delay (days)''' period. | |
| − | + | ||
| − | + | This restriction is set in '''Localization → Orders Status'''. | |
| − | + | ||
| − | + | Go to '''Localization → Orders Status''' to see like this: | |
| − | + | ||
| − | |||
| − | |||
<div class="mainpage_box"> | <div class="mainpage_box"> | ||
| − | [[File: | + | [[File:order-status-download.jpg|link=|1500px]] |
</div> | </div> | ||
| − | + | ||
| − | + | See '''Downloads Status''' for '''Pending (default)''' is disabled, indicated by the red cross. | |
| − | + | ||
| − | + | See '''Downloads Status''' for '''Processing''' and '''Delivered''' is enabled, indicated by the green check/tick. | |
| − | + | ||
| − | + | If the only payment options require immediate payment, for example, card payment, then this restriction can be changed so the link to download the product will appear on the checkout success page when they have paid so they can download immediately. | |
| − | + | ||
| − | + | The link will still also appear in their order in their order history in their account and stay there for the '''Expiry delay (days)''' period. | |
| − | + | ||
| − | + | *To change the restriction go to '''Localization → Orders Status''' | |
| − | |||
| − | *To change the | ||
*Click '''Pending (default)''' to see this: | *Click '''Pending (default)''' to see this: | ||
<div class="mainpage_box"> | <div class="mainpage_box"> | ||
| − | [[File:ordersstatus. | + | [[File:ordersstatus.jpg|link=]] |
</div> | </div> | ||
| − | * | + | *Select '''Allow downloads of virtual products at this order status level''' |
| + | *Click <span class="btn-green">Save</span> | ||
| + | |||
| + | The '''Downloads Status''' for '''Pending (default)''' will now be enabled, indicated by a green check/tick. | ||
| + | |||
<hr> | <hr> | ||
| − | {{ | + | {{Forum}} |
| + | {{Pro}} | ||
{{Contribute}} | {{Contribute}} | ||
Latest revision as of 11:59, 2 November 2024
From admin go to  Configuration → Download to see this:

This enables the store to sell downloadable files also known as virtual products.
Everything is set, ready to go, edit only if required.
There is an example of this shown in the CE Phoenix Cart Store Demo.
It can also be seen how that was set up in the CE Phoenix Cart Admin Demo.
Downloadable File
- Create the downloadable file, name it using lowercase and no spaces.
- Upload the file to the download folder/directory on the host server.
- The setting Download by redirect passes the file from the download folder/directory to the pub folder/directory so it can be downloaded but adds a random folder name so it can not be found by public search.
Downloadable Product
Create Product
- Create the new product in your shop in Catalog → Categories/Products - see Categories/Products
- Ensure to set the Products Weight to 0
Product Attributes
- Go to Catalog → Products Attributes
- Click Options button to see like this:

- Enter a new Option Name, for example, Download.
- Enter a Sort Order.
- Click + to save.
- Click Values button to see like this:

- Choose the Option Name from the pull down menu, for example, Download.
- Enter an Option Value in the input box, for example, PDF.
- Enter a Sort Order.
- Click + to save.
- Repeat to assign additional Option Values to Option Names, for example, if you have optional downloadable file types.
- Click Attributes button to see like this:

- Choose the Product Name from the pull down menu.
- Choose the Option Name from the pull down menu, in this example, Download.
- Choose the Option Value from the pull down menu, in this example, PDF.
- Enter a net price adjustment in the Value Price input box if required.
- Enter a + or - prefix in the Prefix input box to add or subtract the price adjustment from the product price.
- Enter the exact file name of the downloadable file, including the file extension, for example .pdf in the Filename: input box.
- The Expiry delay (days) and Maximum number of downloads can be changed from the defaults already set if required.
- Click + to save.
- Repeat for each Option Name and Option Value you wish to apply to the product.
Customer Experience
When a customer checks out and pays on the store, the order status is then set to Pending by default.
The customer will not be able to download the product. This prevents them getting the download for free in case one of your payment options is by deferred payment, for example, by cheque or bank payment.
When the store owner changes the order status to Processing or Delivered, the link to download the product will then appear in the customer's order, in their order history, in their profile, when they are logged in on the store.
It appears like this:

This link will stay there for the Expiry delay (days) period.
This restriction is set in Localization → Orders Status.
Go to Localization → Orders Status to see like this:
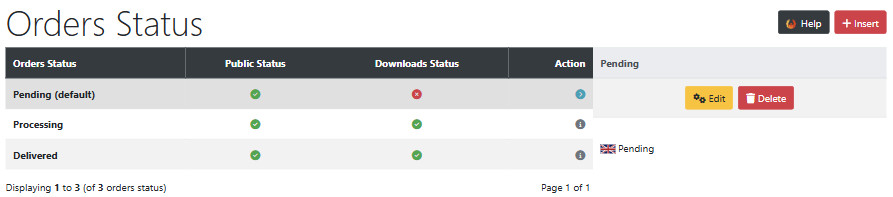
See Downloads Status for Pending (default) is disabled, indicated by the red cross.
See Downloads Status for Processing and Delivered is enabled, indicated by the green check/tick.
If the only payment options require immediate payment, for example, card payment, then this restriction can be changed so the link to download the product will appear on the checkout success page when they have paid so they can download immediately.
The link will still also appear in their order in their order history in their account and stay there for the Expiry delay (days) period.
- To change the restriction go to Localization → Orders Status
- Click Pending (default) to see this:

- Select Allow downloads of virtual products at this order status level
- Click Save
The Downloads Status for Pending (default) will now be enabled, indicated by a green check/tick.
Many Addons and Extensions available in the CE Phoenix Cart Addons Library
If help is needed, support is available in the CE Phoenix Cart Support Forum
Phoenix Cart User Guide, like CE Phoenix Cart, is free to use but is maintained by unpaid volunteers.
All other content is the reserved Intellectual Property and Copyright of phoenixcart.org
