Difference between revisions of "GIMP"
From Phoenix Cart User Guide
PeterRobert (talk | contribs) |
PeterRobert (talk | contribs) |
||
| (5 intermediate revisions by the same user not shown) | |||
| Line 1: | Line 1: | ||
| − | <div class="btn btn-grey btn-back">{{#fas:arrow-left}} Back</div> <div class="btn btn-grey btn-must-have">{{#fas:tools}} Must Have Tools</div> | + | <div class="btn btn-grey btn-back">{{#fas:arrow-left}} Back</div> <div class="btn btn-grey btn-must-have">[[Must_Have_Tools|{{#fas:tools}} Must Have Tools]]</div> |
<hr> | <hr> | ||
| − | + | __TOC__ | |
| + | ==='''Introduction'''=== | ||
GIMP (GNU Image Manipulation Program) is free to download and use at the following link - choose Download GIMP Directly: | GIMP (GNU Image Manipulation Program) is free to download and use at the following link - choose Download GIMP Directly: | ||
| Line 19: | Line 20: | ||
---- | ---- | ||
| − | + | ==='''Exposure'''=== | |
*Adjust exposure if required - go to '''Colors → Exposure...''' | *Adjust exposure if required - go to '''Colors → Exposure...''' | ||
**Use the '''Exposure''' up and down arrows or slider to adjust and preview. | **Use the '''Exposure''' up and down arrows or slider to adjust and preview. | ||
| Line 29: | Line 30: | ||
---- | ---- | ||
| − | + | ==='''Framing, Cropping'''=== | |
*Adjust framing if required - go to '''Tools → Transform Tools → Crop''' | *Adjust framing if required - go to '''Tools → Transform Tools → Crop''' | ||
**Click on the image and drag the cursor to select a crop area. | **Click on the image and drag the cursor to select a crop area. | ||
| Line 39: | Line 40: | ||
---- | ---- | ||
| − | + | ==='''Resize, Scale'''=== | |
*Resize (scale) your photograph - go to '''Image → Scale Image...''' | *Resize (scale) your photograph - go to '''Image → Scale Image...''' | ||
**Images for website should be about 500px - 800px | **Images for website should be about 500px - 800px | ||
| Line 53: | Line 54: | ||
---- | ---- | ||
| − | + | ==='''Format'''=== | |
| − | *Images on the website can be any format e.g. landscape, portrait or differing ratios but it is advisable to make them all the same by adding a background - square works well. Your original photographs may all be different formats and ratios but | + | *Images on the website can be any format e.g. landscape, portrait or differing ratios but it is advisable to make them all the same by adding a background or canvas - square works well. Your original photographs may all be different formats and ratios but the canvas can be used to fill the space around them to make them the same. |
**Change format - go to '''Image → Canvas Size...''' | **Change format - go to '''Image → Canvas Size...''' | ||
**E.g. to make the image square, change whichever is the smallest dimension to the value of the largest. | **E.g. to make the image square, change whichever is the smallest dimension to the value of the largest. | ||
| Line 76: | Line 77: | ||
---- | ---- | ||
| − | + | ==='''Optimise'''=== | |
*Optimise and save the image. | *Optimise and save the image. | ||
**Go to '''File → Export As...''' | **Go to '''File → Export As...''' | ||
| − | **Enter a new name in the '''Name:''' input box - use lower case and hyphens '''-''' instead of spaces. | + | **Enter a new name in the '''Name:''' input box - use lower case and hyphens '''-''' instead of spaces including the file type. For example, '''your-image.jpg''' |
| − | + | **File type is a choice. Either '''.jpg''' or '''.webp''' are advisable. | |
| − | ** | + | **Navigate to the '''images''' folder/directory in your backup on your computer in the navigation panel and save there for use in your project. |
| + | |||
<div class="mainpage_box"> | <div class="mainpage_box"> | ||
[[File:gimp6.png|link=]] | [[File:gimp6.png|link=]] | ||
| Line 88: | Line 90: | ||
**Tick the '''Show preview in image window''' box. | **Tick the '''Show preview in image window''' box. | ||
**The '''File size''' will then show. | **The '''File size''' will then show. | ||
| − | **Images for website should be | + | **Images for website should be less than 100kb for fast loading. |
| − | **Use the '''Quality:''' up and down arrows or slider to reduce the file size down to less than | + | **Use the '''Quality:''' up and down arrows or slider to reduce the file size down to less than 100kb. |
**Check the preview of the image to ensure image quality is acceptable. | **Check the preview of the image to ensure image quality is acceptable. | ||
**Click '''Export''' | **Click '''Export''' | ||
Latest revision as of 08:02, 26 September 2024
Back
Introduction
GIMP (GNU Image Manipulation Program) is free to download and use at the following link - choose Download GIMP Directly:
https://www.gimp.org/downloads/
Product photography is an art and a profession in itself - pay a professional if required.
Tips for D.I.Y. for smaller products. Use a bright natural daylight source e.g. in front of a large north facing window to avoid strong shadows from direct sunlight. Use a uniform background or backdrop e.g. a plain sheet draped from horizontal to vertical. The photographs may not be perfectly exposed or perfectly framed but that can be changed using the software.
- Open GIMP.
- Open your photograph - go to File → Open... or Ctrl+O on keyboard.
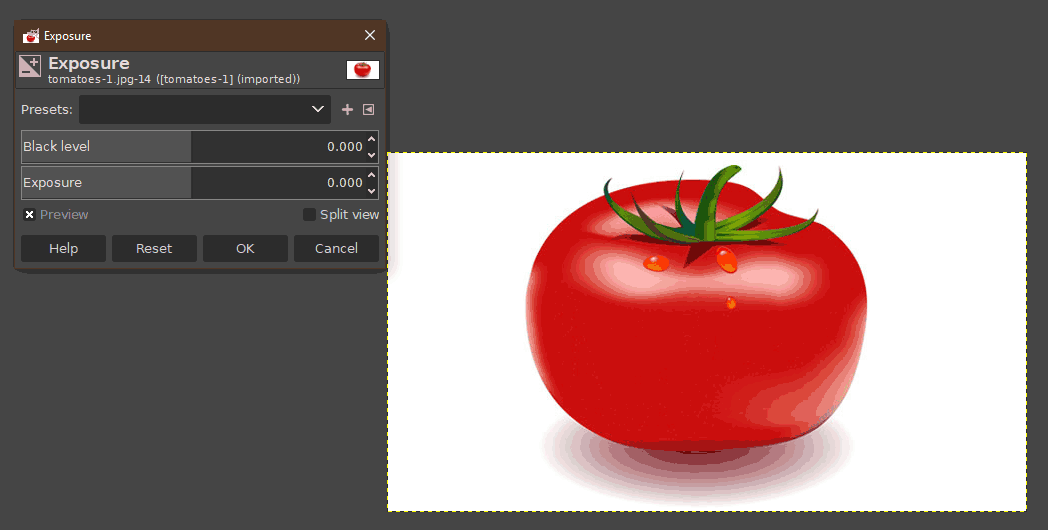
Exposure
- Adjust exposure if required - go to Colors → Exposure...
- Use the Exposure up and down arrows or slider to adjust and preview.
- Click OK
Framing, Cropping
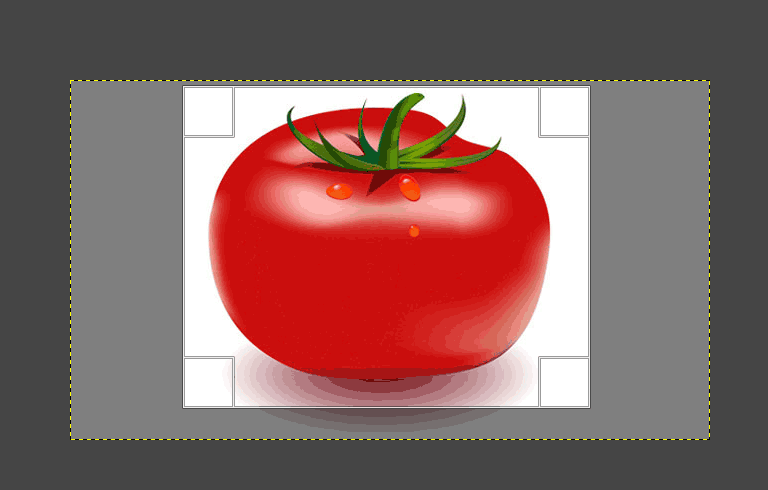
- Adjust framing if required - go to Tools → Transform Tools → Crop
- Click on the image and drag the cursor to select a crop area.
- Adjust the crop area and click Enter on keyboard.
Resize, Scale
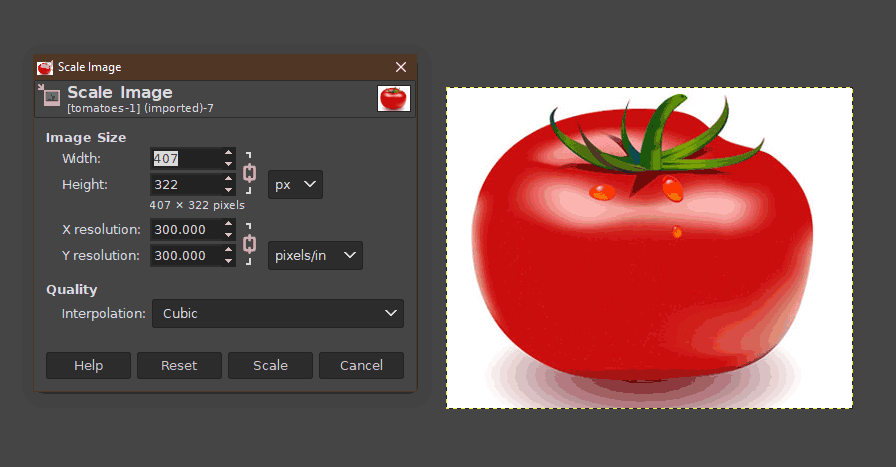
- Resize (scale) your photograph - go to Image → Scale Image...
- Images for website should be about 500px - 800px
- Enter a value for either the height or the width and the other will change accordingly.
- Images for website should be 72 pixels/in per inch so change the value.
- Click Scale
- Ensure view is full size - go to View → Zoom and adjust to 100% if necessary.
Format
- Images on the website can be any format e.g. landscape, portrait or differing ratios but it is advisable to make them all the same by adding a background or canvas - square works well. Your original photographs may all be different formats and ratios but the canvas can be used to fill the space around them to make them the same.
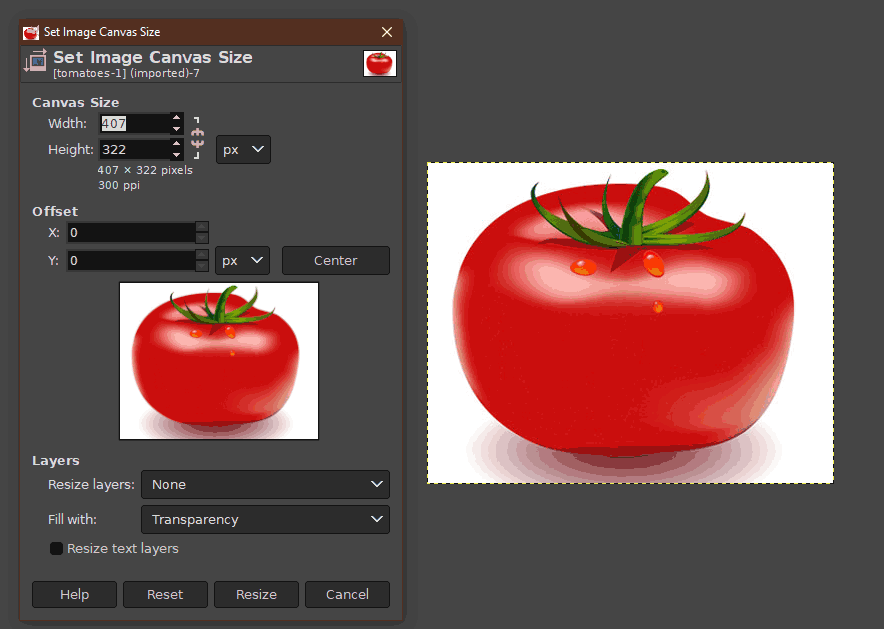
- Change format - go to Image → Canvas Size...
- E.g. to make the image square, change whichever is the smallest dimension to the value of the largest.
- Click Center
- Choose Background color from the Fill with: drop down menu.
- Click Resize
- Alternatively, if the background of your website is a different colour, set this colour as background colour first.
- Go to Tools → Toolbox
- Click the background colour.
- Enter the hex code of the website background colour in the HTML notation: input box
- Click OK

Optimise
- Optimise and save the image.
- Go to File → Export As...
- Enter a new name in the Name: input box - use lower case and hyphens - instead of spaces including the file type. For example, your-image.jpg
- File type is a choice. Either .jpg or .webp are advisable.
- Navigate to the images folder/directory in your backup on your computer in the navigation panel and save there for use in your project.
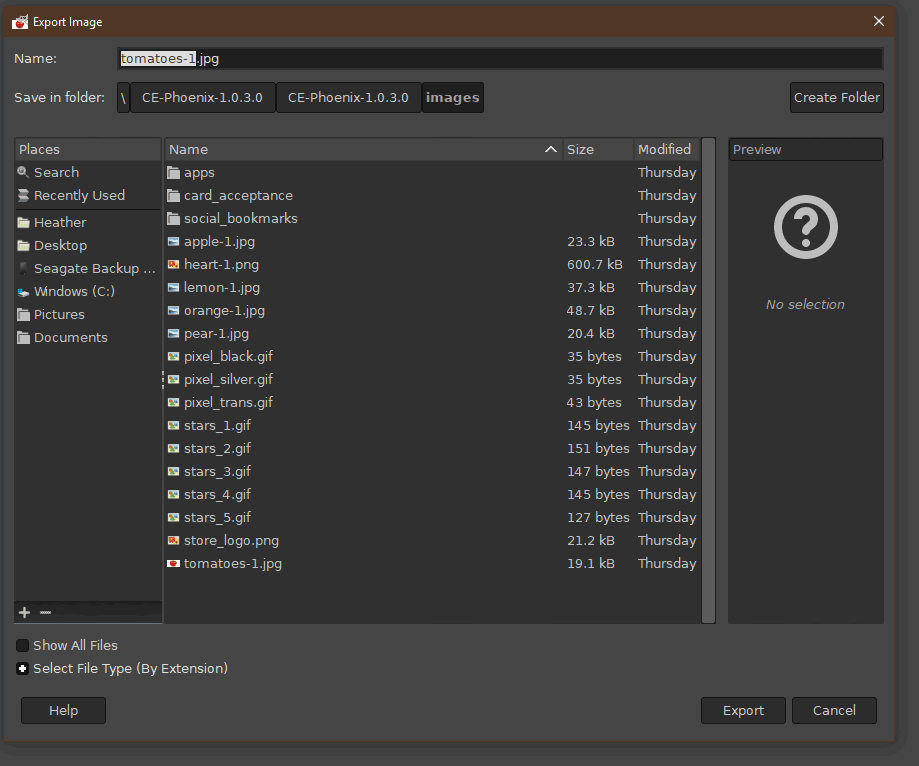
- Click Export
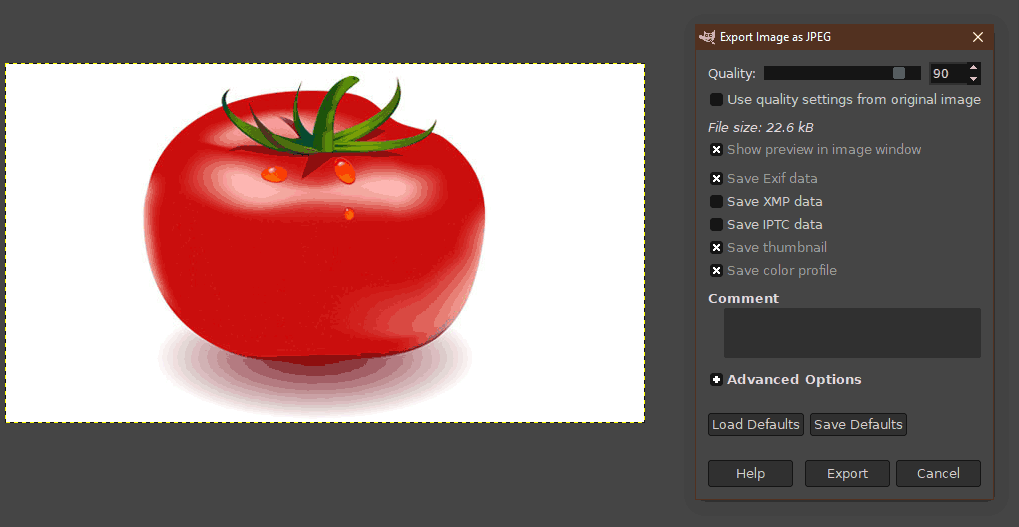
- Tick the Show preview in image window box.
- The File size will then show.
- Images for website should be less than 100kb for fast loading.
- Use the Quality: up and down arrows or slider to reduce the file size down to less than 100kb.
- Check the preview of the image to ensure image quality is acceptable.
- Click Export

Please visit again soon for additions and changes
Phoenix Cart User Guide, like CE Phoenix Cart, is free to use but is maintained by unpaid volunteers.
All other content is the reserved Intellectual Property and Copyright of phoenixcart.org
