Content
From Phoenix Cart User Guide
Revision as of 11:37, 16 March 2021 by PeterRobert (talk | contribs)
<historylink type="back">🠈 Back</historylink> 🠉 ADMINISTRATION
From admin go to  Modules → Content - you will see this:
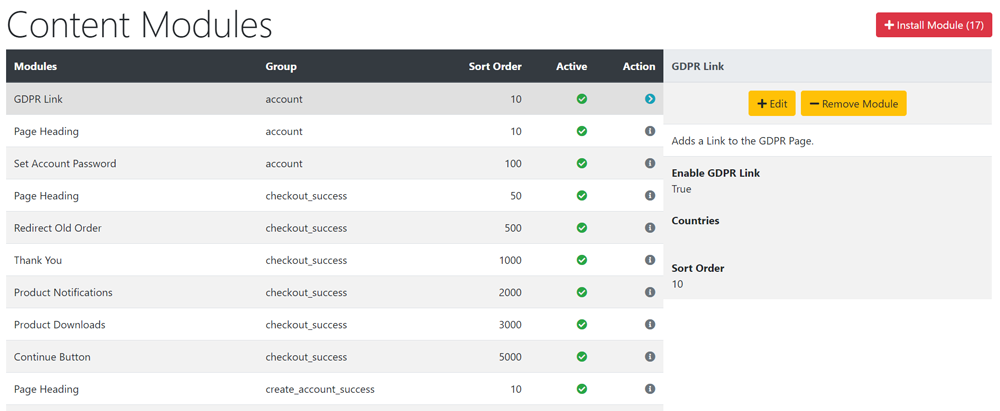
- This list shows all the content modules installed in the shop by default.
- They are sorted into Groups according to on which page they display.
- They are also sorted by the Sort Order in which they are displayed on the page in relation to each other.
- The Active column shows if they are enabled (currently displayed) on the page - green if they are enabled - red if they are disabled.
- Most groups are self explanatory.
- account refers to the page showing customer details and history they can access when they are logged in.
- checkout_success refers to the page shown to a customer when they have completed an order.
- footer refers to the static element shown at the bottom of every page.
- footer_suffix refers to the static element shown below the footer.
- header refers to the static element that shows at the top of every page.
- index refers to the front home page.
- index_nested refers to a page that lists categories or sub-categories.
- index_products refers to a page that lists products.
- log_in refers to the page shown when a login link is clicked or before a customer checks out.
- navigation refers to the static element that shows at the top of every page and contains the navigation bar.
- product_info refers to a page that shows a single product.
- shopping_cart refers to the shopping cart page.
- Click the item in the Modules column list to select it.
- Click Edit to open the edit panel.
- Change the setting for Enable... Module to False.
- Click Save
- The Active column button will change from green to red to show it has been disabled.
- The display width of most content modules can be changed.
- Click the item in the Modules column list to select it.
- Click Edit to open the edit panel.
- Change the Content Width setting according to the instructions shown.
- Click Save
- To install additional content modules:
- Click Install Module shown top right of screen - the number shown next to it indicates the number of modules available.
- Click a module to use from the list.
- Click Install Module
- Click Edit
- Choose a Content Width setting according to the instructions shown.
- Enter a Sort Order value to order the display of the module in relation to the other modules in the same group.
- Do not leave 0 as the Sort Order on modules as it can cause problems.
- You can give it any number but note and follow the convention used as default which is helpful.
- Click Save

Please visit again soon for additions and changes
Phoenix Cart User Guide, like CE Phoenix Cart, is free to use but is maintained by unpaid volunteers.
All other content is the reserved Intellectual Property and Copyright of phoenixcart.org
