Payment
From admin go to  Modules → Payment - you will see this:

Cash On Delivery
This is installed by default as an example.
It allows checkout without payment.
It is commonly used by store owners to perform a test checkout.
Disable or remove/uninstall if it is not required.
Check/Money Order
This is installed by default as an example.
It allows checkout without payment for subsequent payment by Check/Money Order.
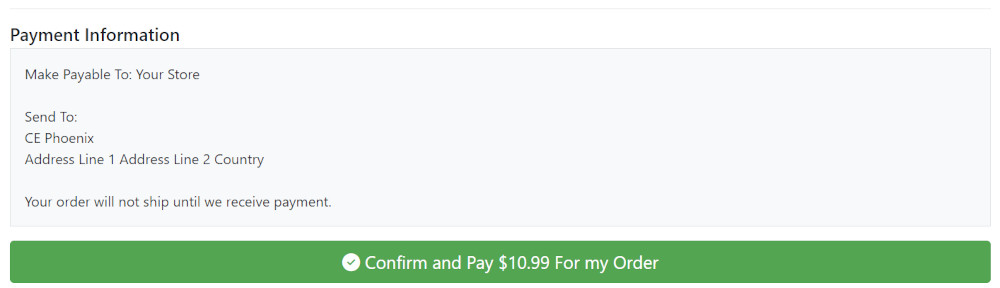
Edit the module to set Make Payable to:
This will add the following section to the Checkout Confirmation (checkout_confirmation.php) page:
Disable or remove/uninstall if it is not required.
Paypal Standard
Paypal Standard is a basic payment integration that transfers the customer away from your site to Paypal on checkout confirmation, and returns them when the paypal payment is completed. Paypal also lets your site know about the payment (and any subsequent changes) by Instant Payment Notifications. If the customer does not return after a successful payment (e.g. their connection drops) the IPN will still confirm the order. More sophisticated Paypal integration is available in Phoenix Cart Addons area.
Seller Email
This is the email you are using to collect payments.
Primary Paypal email
This is left blank for many sites, it is only needed if you are sending payments to an additional email on your paypal account.
PDT Identity Token
This is used to verify returned info from paypal to prevent your payments being hijacked. To find it:
Log into your paypal account.
On the dropdown on your name in the top right, choose account settings.
Under Products and Services on the left, choose Website payments.
Find Website Preferences in the list and choose Update.
Now on this page:
-- set Auto return to On and set the return url to that displayed in the module admin and click Save
-- in the next section, set Payment data transfer to On
-- an identity token should have appeared magically, if it didn't appear toggle pdt off and back on again; copy the token to your module settings
Click Back to Profile at the top and scroll down to Instant Payment Notifications and choose Update
-- copy the notification url from your module
Transaction Method
For payments to be taken straight away on checkout, choose Sale. If set to Authorize, you need to capture the payment later in your Paypal account, e.g. when the stock has been sourced.
Invoice Prefix
If you have multiple online stores connecting to the same Paypal account, set an invoice prefix to avoid problems with duplicate invoice numbers.
Stripe SCA
Configuration
The basic configuration of the Stripe SCA module is the same as the standard Stripe module, requiring Publishable and Secret API keys, however as the order fulfillment has been moved to a webhook, you need to add the address of the Stripe SCA webhook at your store to your Stripe account dashboard, and add the webhook signing secret it generates to the Stripe SCA payment module configuration.
Login to your account at the Stripe web site, and select Developers > Webhooks
select '+ Add endpoint' at the upper right of the page
set the URL to: https://yourstore.url/ext/modules/payment/stripe_sca/webhook.php
select version as 'Latest API version'
select event 'payment_intent.succeeded' and 'payment_intent.payment_failed'
click 'add endpoint' to save the webhook endpoint.
Then select the new endpoint URL from the list of end points, and then 'click to reveal' to see the Signing Secret. Copy and paste the text of the signing secret to the Webhook Signing Secret in the Stripe SCA module configuration form.
Note that the 'view test data' switch at the Stripe dashboard toggles between live and test modes, and there are seperate API keys and webhooks in each mode. You have to create a webhook endpoint in the test mode to be used in testing the module. If your test environment is on a local network machine that is not directly accessible from the internet, you can create a free account at ngrok.com, to create a tunnel to the webhook URL on your local test machine. See https://stripe.com/docs/webhooks/setup for more details.
The Stripe SCA module adds a log table, stripe_event_log, to the database, and if you select 'Log events?' in the Stripe SCA configuration, it will record each Stripe API call with the parameters that are passed to Stripe and the response received.
Edit Modules
- To edit a module, click on the module in the list to select it.
- Click Edit
- Enable/Disable module by setting to True or False as required or click on the item in the list and click Remove Module to remove/uninstall it if required.
- Apply this payment module to a defined Tax Zone by choosing it in the drop down menu below Payment Zone or leave as --none-- to apply the payment module to all Tax Zones.
- Leave Set Order Status as default unless otherwise required.
- Enter a Sort Order of display value. Do not leave 0 as the Sort Order on modules as it can cause problems. You can give it any number, in this case enter 10 so if you decide to install another module it leaves the option of entering a lesser value for the next if required.
- Click Save
3rd Party Addons
There are more Payment Addons available in the Addons Library here;
https://phoenixcart.org/forum/app.php/addons/free/payment-21
https://phoenixcart.org/forum/app.php/addons/commercial/payment-35
The most popular payment provider modules, Paypal and Stripe, are published and provided for FREE by Phoenix Cart Certified Developers.
You can express your thanks and give back by using their Buy Me a Beverage link to donate to them.
Many Addons and Extensions available in the CE Phoenix Cart Addons Library
If help is needed, support is available in the CE Phoenix Cart Support Forum
Phoenix Cart User Guide, like CE Phoenix Cart, is free to use but is maintained by unpaid volunteers.
All other content is the reserved Intellectual Property and Copyright of phoenixcart.org
