Difference between revisions of "Set up Shop Details"
From Phoenix Cart User Guide
PeterRobert (talk | contribs) |
PeterRobert (talk | contribs) |
||
| (30 intermediate revisions by the same user not shown) | |||
| Line 1: | Line 1: | ||
| − | < | + | <div class="btn btn-grey btn-back">{{#fas:arrow-left}} Back</div> <div class="btn btn-grey btn-setup-shop">{{#fas:play-square}} [[Set_Up_Store|Set Up Store]]</div> |
| − | < | ||
<hr> | <hr> | ||
| − | From admin go to '''Configuration → My Store''' - you will see this: | + | __TOC__ |
| + | __FORCETOC__ | ||
| + | From admin go to [[File:adminnavbarconfig.png|link=]] '''Configuration → My Store''' - you will see this: | ||
<div class="mainpage_box"> | <div class="mainpage_box"> | ||
| − | [[File:mystore. | + | [[File:mystore.jpg|link=|1500px]] |
</div> | </div> | ||
| − | Some settings for My Store are already personalised from when you installed Phoenix | + | ==='''Edit Settings'''=== |
| + | Some settings for '''My Store''' are already personalised from when you installed CE Phoenix Cart but they can be changed now if required. | ||
| + | *'''Store Name''': This will show on documents, on the shop and in e-mails. | ||
| + | *'''Store Owner''': This will show in e-mails. | ||
| + | *'''E-Mail Address''': This will show in e-mails. It is advisable that a custom domain e-mail is used, not a generic e-mail provider. | ||
| − | To | + | To change any setting: |
| + | *Click the item in the '''Title''' column list to select it. | ||
| + | *Click <span class="btn-yellow">Edit</span> | ||
| + | *Change the settings in the edit panel. | ||
| + | *Click <span class="btn-green">Save</span> | ||
| − | |||
| − | |||
| − | |||
| − | |||
| + | To have your store ready just make the following changes for now. | ||
| + | *'''Country''' | ||
| + | **Enter the Country in which your store is located from the drop down menu. Ensure to update '''Zone'''. | ||
| − | * | + | *'''Zone''' |
| − | * | + | **Enter the Zone in which your store is located from the drop down menu. |
| − | *Enter the Zone in which your | ||
| − | |||
| + | *'''Switch To Default Language Currency''' | ||
| + | **Set to '''true''' if you have more than one language installed - the currency will change to match the language selected by the customer. | ||
| − | * | + | *'''Send Extra Order E-mails To''' |
| − | * | + | **By default, an Order E-Mail will be sent to the customer when they have completed an order. If left blank, only the customer will receive an Order E-Mail. Enter the store owner e-mail address and an extra Order E-Mail will be sent to that address. |
| − | * | ||
| − | |||
| + | *'''Display Prices with Tax''' | ||
| + | **Set to '''true''' if you wish to show all prices inclusive of tax, otherwise tax will only be added in checkout. | ||
| − | * | + | *'''Store Address''' |
| − | * | + | **Enter your address as you wish. This will be displayed on documents and on the store. |
| − | * | + | |
| − | + | *'''Store Phone''' | |
| + | **Enter your telephone number if required - this will be displayed on documents and on the store. | ||
| + | |||
| + | *'''Store Tax ID''' | ||
| + | **Enter your Tax ID (tax number) if required - this will be displayed on documents and on the store. | ||
| + | |||
| + | ---- | ||
For a comprehensive guide to all the settings go to <BIG>'''[[My Store]]'''</BIG> | For a comprehensive guide to all the settings go to <BIG>'''[[My Store]]'''</BIG> | ||
| + | <!-- | ||
| + | ---- | ||
| + | |||
| + | <BIG>'''[https://www.youtube.com/watch?v=TMSoRgaCfAs Watch on YouTube]'''</BIG> | ||
| + | |||
| + | --> | ||
<hr> | <hr> | ||
| − | <span class="btn-grey">[[ | + | <span class="btn-grey btn-prev">{{#fas:arrow-left}} [[Set_up_Zones|Previous Step]]</span> |
| − | <span class="btn-grey">[[ | + | <span class="btn-grey btn-next">[[Set_up_Customer_Details|Next Step]] {{#fas:arrow-right}}</span> |
<hr> | <hr> | ||
| − | {{ | + | {{Pro}} |
| + | {{Forum}} | ||
{{Contribute}} | {{Contribute}} | ||
Latest revision as of 08:24, 6 September 2024
Back
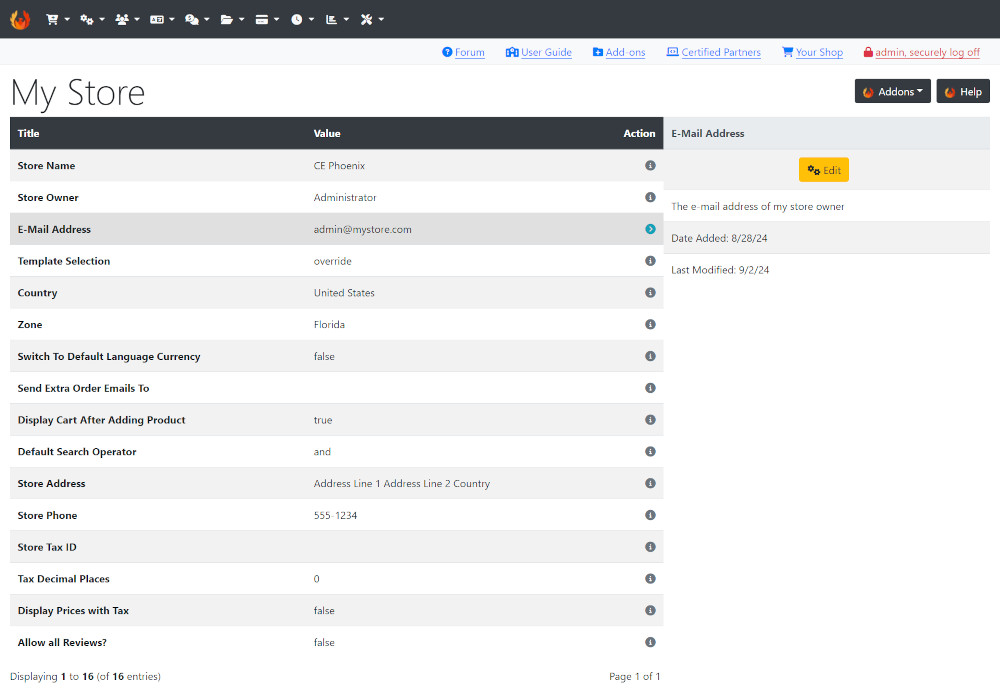
From admin go to  Configuration → My Store - you will see this:
Edit Settings
Some settings for My Store are already personalised from when you installed CE Phoenix Cart but they can be changed now if required.
- Store Name: This will show on documents, on the shop and in e-mails.
- Store Owner: This will show in e-mails.
- E-Mail Address: This will show in e-mails. It is advisable that a custom domain e-mail is used, not a generic e-mail provider.
To change any setting:
- Click the item in the Title column list to select it.
- Click Edit
- Change the settings in the edit panel.
- Click Save
To have your store ready just make the following changes for now.
- Country
- Enter the Country in which your store is located from the drop down menu. Ensure to update Zone.
- Zone
- Enter the Zone in which your store is located from the drop down menu.
- Switch To Default Language Currency
- Set to true if you have more than one language installed - the currency will change to match the language selected by the customer.
- Send Extra Order E-mails To
- By default, an Order E-Mail will be sent to the customer when they have completed an order. If left blank, only the customer will receive an Order E-Mail. Enter the store owner e-mail address and an extra Order E-Mail will be sent to that address.
- Display Prices with Tax
- Set to true if you wish to show all prices inclusive of tax, otherwise tax will only be added in checkout.
- Store Address
- Enter your address as you wish. This will be displayed on documents and on the store.
- Store Phone
- Enter your telephone number if required - this will be displayed on documents and on the store.
- Store Tax ID
- Enter your Tax ID (tax number) if required - this will be displayed on documents and on the store.
For a comprehensive guide to all the settings go to My Store
Many Addons and Extensions available in the CE Phoenix Cart Addons Library
If help is needed, support is available in the CE Phoenix Cart Support Forum
Phoenix Cart User Guide, like CE Phoenix Cart, is free to use but is maintained by unpaid volunteers.
All other content is the reserved Intellectual Property and Copyright of phoenixcart.org
