Difference between revisions of "Products Attributes"
PeterRobert (talk | contribs) |
PeterRobert (talk | contribs) |
||
| (21 intermediate revisions by the same user not shown) | |||
| Line 1: | Line 1: | ||
| − | < | + | <div class="btn btn-grey btn-back">{{#fas:arrow-left}} Back</div> <div class="btn btn-grey btn-admin">{{#fas:cog}} Administration</div> |
| − | < | ||
<hr> | <hr> | ||
| + | __TOC__ | ||
| + | __FORCETOC__ | ||
| + | From admin go to [[File:adminnavbarcatalog.png|link=]] '''Catalog → Products Attributes''' - you will see this: | ||
| + | <div class="mainpage_box"> | ||
| + | [[File:attributes.jpg|link=|1500px]] | ||
| + | </div> | ||
| + | |||
| + | Click the <span class="btn-info">Attributes</span> <span class="btn-info">Options</span> <span class="btn-info">Values</span> buttons to expand or close the sections. | ||
| − | |||
| − | ''' | + | ---- |
| + | ==='''New Options & Attributes'''=== | ||
| + | Set up <span class="btn-info">Options</span> first before then assigning <span class="btn-info">Values</span> to the Options, then configure <span class="btn-info">Attributes</span> by applying Options and Values to Products. | ||
| − | |||
| − | |||
| − | ''' | + | ---- |
| + | ==='''Attributes'''=== | ||
| − | |||
| − | |||
| − | |||
| − | |||
<div class="mainpage_box"> | <div class="mainpage_box"> | ||
| − | [[File: | + | [[File:attributes-new.jpg|link=|1500px]] |
</div> | </div> | ||
| − | |||
*Choose a '''Product Name''' from the pull down menu. | *Choose a '''Product Name''' from the pull down menu. | ||
*Choose an '''Option Name''' from the pull down menu. | *Choose an '''Option Name''' from the pull down menu. | ||
*Choose an '''Option Value''' from the pull down menu. | *Choose an '''Option Value''' from the pull down menu. | ||
| − | *Enter a net price adjustment in the '''Value Price''' input box. | + | *Enter a net price adjustment in the '''Value Price''' input box if required. |
| − | *Enter a | + | *Enter a + or - prefix in the '''Prefix''' input box to add or subtract the price adjustment from the product price. |
| − | *Click <span | + | *Click <span style="color:green">'''<big>+</big>'''</span> to save. |
| − | *Repeat for each Option Name and Option Value you wish to apply to a product. | + | *Repeat for each Option Name and Option Value you wish to apply to a product. |
| + | |||
| + | |||
| + | ---- | ||
| + | ==='''Options'''=== | ||
| + | |||
| + | <div class="mainpage_box"> | ||
| + | [[File:options-new.jpg|link=|1500px]] | ||
| + | </div> | ||
| + | |||
| + | *Enter a new '''Option Name''' in the input box. | ||
| + | *Enter a '''Sort Order'''. | ||
| + | *Click <span style="color:green">'''<big>+</big>'''</span> to save. | ||
| + | |||
| + | |||
| + | ---- | ||
| + | ==='''Values'''=== | ||
| + | |||
| + | <div class="mainpage_box"> | ||
| + | [[File:values-new.jpg|link=|1500px]] | ||
| + | </div> | ||
| + | |||
| + | *Choose an '''Option Name''' from the pull down menu. | ||
| + | *Enter an '''Option Value''' in the input box. | ||
| + | *Enter a '''Sort Order'''. | ||
| + | *Click <span style="color:green">'''<big>+</big>'''</span> to save. | ||
| + | *Repeat to assign additional Option Values to Option Names. | ||
| + | |||
| + | |||
| + | <hr> | ||
| + | |||
| + | |||
| + | By default, the selection of Options & Attributes is enforced, that is, a customer must choose an option before adding to cart. | ||
| + | |||
| + | This can be changed in the module configuration. | ||
| + | |||
| + | *From your admin go to '''Modules → Layout''' | ||
| + | |||
| + | *Click on '''Options & Attributes''' module in the list | ||
| + | |||
| + | *Click <span class="btn-yellow">Edit</span> | ||
| + | *Set '''Add Helper Text''' and '''Enforce Selection''' to '''False''' | ||
| + | *Click <span class="btn-green">Save</span> | ||
| + | |||
| + | |||
| + | ---- | ||
| + | |||
| + | |||
| + | If digital downloads are being sold - see <big>'''[[Download]]'''</big> | ||
<hr> | <hr> | ||
| + | {{Forum}} | ||
| + | {{Pro}} | ||
{{Contribute}} | {{Contribute}} | ||
Latest revision as of 09:30, 1 November 2024
From admin go to  Catalog → Products Attributes - you will see this:
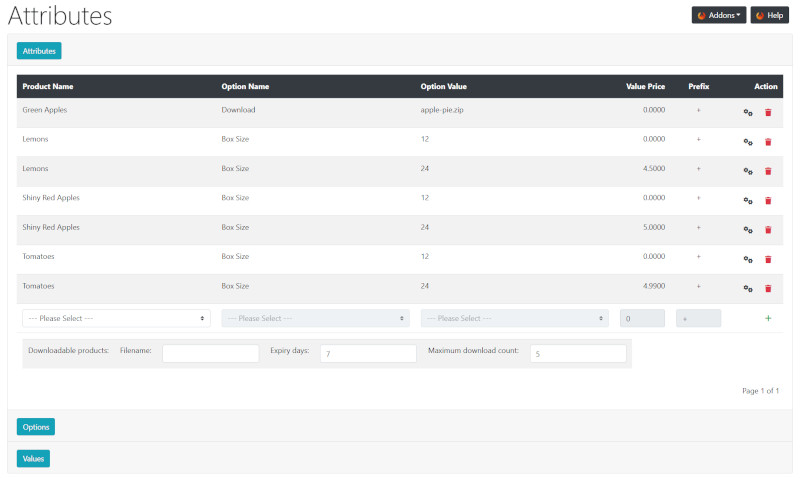
Click the Attributes Options Values buttons to expand or close the sections.
New Options & Attributes
Set up Options first before then assigning Values to the Options, then configure Attributes by applying Options and Values to Products.
Attributes

- Choose a Product Name from the pull down menu.
- Choose an Option Name from the pull down menu.
- Choose an Option Value from the pull down menu.
- Enter a net price adjustment in the Value Price input box if required.
- Enter a + or - prefix in the Prefix input box to add or subtract the price adjustment from the product price.
- Click + to save.
- Repeat for each Option Name and Option Value you wish to apply to a product.
Options

- Enter a new Option Name in the input box.
- Enter a Sort Order.
- Click + to save.
Values

- Choose an Option Name from the pull down menu.
- Enter an Option Value in the input box.
- Enter a Sort Order.
- Click + to save.
- Repeat to assign additional Option Values to Option Names.
By default, the selection of Options & Attributes is enforced, that is, a customer must choose an option before adding to cart.
This can be changed in the module configuration.
- From your admin go to Modules → Layout
- Click on Options & Attributes module in the list
- Click Edit
- Set Add Helper Text and Enforce Selection to False
- Click Save
If digital downloads are being sold - see Download
Many Addons and Extensions available in the CE Phoenix Cart Addons Library
If help is needed, support is available in the CE Phoenix Cart Support Forum
Phoenix Cart User Guide, like CE Phoenix Cart, is free to use but is maintained by unpaid volunteers.
All other content is the reserved Intellectual Property and Copyright of phoenixcart.org
