Change Style and Color
Intoduction
CE Phoenix Cart is designed to look great out of the box but looks can be changed however you want, to suit your brand and stand out from the crowd.
The styles of every element are in the code of CE Phoenix Cart, as well as in the code of Bootstrap, which ensures everything looks great on every size of device.
However, CE Phoenix Cart gives you ultimate control to override styles with your own.
This is done in one file named user.css (note the special file type .css - it is a Cascading Style Sheet) by using the following.
Elements are the basic building blocks of a webpage, representing content and structure such as headings, paragraphs, images, buttons etc.
Classes are labels assigned to elements to apply the same styles or behavior to multiple elements.
Id's are unique identifiers assigned to one specific element.
Styles determine how these elements look, including color, size, spacing etc. Styles can target elements via classes, id's or directly.
user.css
This file is found in templates/default/static/
Open it with a file editor to see instructions:
Please don't edit the original of this file.
Instead copy into a template and edit the copy.
Make a copy and upload to /templates/override/static/. The override template is set in a new install but different user.css files can be used in different templates so upload to whichever template you have set in Configuration → My Store → Template Selection, for example, /templates/yourTemplate/static/.
Your browser cache will need to be refreshed to see style changes saved in user.css.
Internet search for how to perform a hard or forced refresh or reload for your browser.
Alternatively see How to Force Website to Show user.css Changes
Elements
To easily identify an element, it is recommended to use developer tools that are include in browsers, for example Google Chrome is used here.
Try it out on the index (home) page of your website for example.
- Right click page - click on Inspect at the bottom of the popup menu - or just Control+Shift+I on your keyboard - the developer tools panel opens on the right of the screen.
- Elements should be already be selected in the toolbar - click on it if it is not.
- Click on Inspect icon (box/arrow) in top left of tools pane - it will turn blue - or just Control+Shift+C on your keyboard.

- Hover the cursor over any part of the webpage and a popup will appear showing the element name and some styles defined for it.
- For example, hover the cursor over the breadcrumb section of the webpage and you will see the following popup.
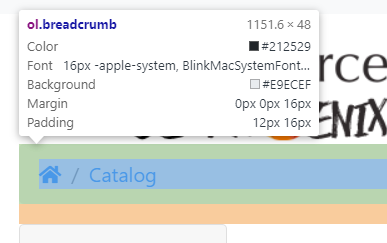
- For full details, click on the element and the element name will show highlighted blue in the top part of the tools pane.

The element name will show as a class or id.
A class has a dot prefix e.g. (.classname) and an id has a hash prefix e.g. (#idname).
A class name is applied to elements that are used in many places whilst an id name is applied to one specific element.
In this example it shows:
<ol class="breadcrumb">...</ol>
- The styles defined for the element will show in the bottom part of the tools pane.
- In this case there is a list of styles defined:
.breadcrumb {
   display: -ms-flexbox;
   display: flex;
   -ms-flex-wrap: wrap;
   flex-wrap: wrap;
   padding: .75rem 1rem;
   margin-bottom: 1rem;
   list-style: none;
   background-color: #e9ecef;
   border-radius: .25rem;
}
Note the format of the define is always element-name { style: value; }
Note that coding always uses U.S. spellings such as color and center.
Change Element Styles
- Use the element name with the correct prefix to define a css style in the user.css file that will override the styles in the core files of Phoenix.
- For example, to change the background colour of the element the following would be saved in the user.css file - change newcolour for the new colour code - include the !important which ensures the new style will override the core files if it does not work without it:
.breadcrumb {
   background-color: newcolour !important;
}
Finding a colour code is easy using the colour picker and Chrome can even show a preview of the colour change on your website before you make any change to the user.css file.
- Click the colour square and a colour picker and colour changer will popup.

- Use the sliders to choose a new colour or click the "eye dropper" icon to choose a colour from your webpage.
- The colour code will automatically show and a preview of the change will show on the webpage.
- Colour codes can be in different formats.
- If you want a simple colour just use a name - there are some built into the system but a long list you can use at https://www.w3schools.com/colors/colors_names.asp
- Most commonly used are Hex Codes prefixed with a #
- RGB codes control the Red Green Blue values of a colour and are useful by adding a fourth A(lpha) element which controls transparency - a value of 1 is opaque, 0 is transparent.
- HSL codes are rarely used and control the Hue Saturation Luminosity values of a colour.
https://coolors.co/ is a useful resource for ideas and inspiration for choosing colour schemes for your website.
Other Styles
There are many styles that can be changed.
Most commonly used for examples:
 .element name {
    border: 1px solid blue !important; - this defines a border around the element 1px thick, solid and coloured blue.
    border-radius: .25rem !important; - this defines rounded corners on the border - rem is a unit of font-size defined for the whole site so if the font-size=16px, 1rem=16px.
    padding: 1rem !important; - padding is the space between the text and the border.
    margin: 20px !important; - margin is a space outside the border.
    font-size: 30px !important; - this defines the text size.
    color: blue !important; - this defines the text colour.
 }
To focus css styles on specific elements
Example:
Change the font size of Product Name on the product page.
On a clean install you will see that Product Name is displayed in a div with the unique class name cm-pi-name - you'll see this on the right of the screen using Dev Tools on your browser.
It is then displayed in a h1 tag with class="display-4" - it is display-4 that sets the font-size, font-weight and line-height - you'll see this bottom right of the screen.
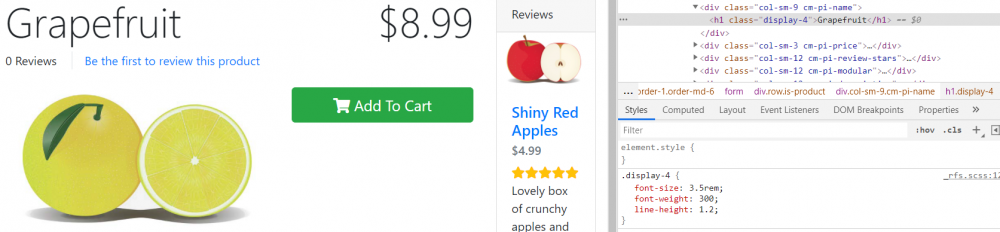
So, to change the look of an element with the class display-4 but only within an element with the class cm-pi-name (so it only changes display-4 in Product Name and doesn't change display-4 everywhere on your site), put this, for example, in user.css:
.cm-pi-name .display-4 {font-size: 2rem;}
Which will then show like the screenshot below (after page reload) - see that the Product Name text has changed and see the change to user.css shown bottom right which has overridden the display-4 setting.
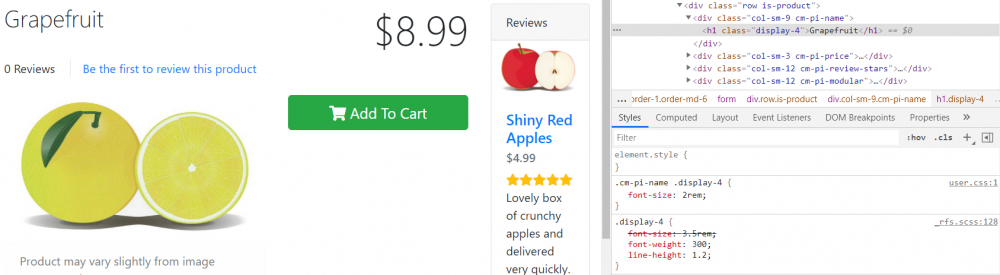
Learn more at:
https://www.w3schools.com/cssref/index.php
https://www.w3schools.com/cssref/css_selectors.php
CSS can be used in many more ways - read more at: https://css-tricks.com/almanac/
Many Addons and Extensions available in the CE Phoenix Cart Addons Library
If help is needed, support is available in the CE Phoenix Cart Support Forum
Phoenix Cart User Guide, like CE Phoenix Cart, is free to use but is maintained by unpaid volunteers.
All other content is the reserved Intellectual Property and Copyright of phoenixcart.org
