Difference between revisions of "Set up Payment Options"
PeterRobert (talk | contribs) |
PeterRobert (talk | contribs) |
||
| (40 intermediate revisions by the same user not shown) | |||
| Line 1: | Line 1: | ||
| − | < | + | <div class="btn btn-grey btn-back">{{#fas:arrow-left}} Back</div> <div class="btn btn-grey btn-setup-shop">{{#fas:play-square}} [[Set_Up_Store|Set Up Store]]</div> |
| − | < | ||
<hr> | <hr> | ||
| − | From admin | + | __TOC__ |
| + | __FORCETOC__ | ||
| + | From admin go to [[File:adminnavbarmod.png|link=]] '''Modules → Payment''' - you will see this: | ||
| + | <div class="mainpage_box"> | ||
| + | [[File:payment.jpg|link=|1500px]] | ||
| + | </div> | ||
| + | ==='''Cash On Delivery'''=== | ||
| + | This is installed by default as an example. | ||
| − | + | It allows checkout without payment. | |
| − | + | It is commonly used by store owners to perform a test checkout. | |
| − | + | Disable or remove/uninstall if it is not required. | |
| − | |||
| − | |||
| − | |||
| − | |||
| − | |||
| − | + | ==='''Check/Money Order'''=== | |
| + | This is installed by default as an example. | ||
| − | + | It allows checkout without payment for subsequent payment by Check/Money Order. | |
| − | |||
| + | Edit the module to set '''Make Payable to:''' | ||
| + | |||
| + | This will add the following section to the '''Checkout Confirmation''' (checkout_confirmation.php) page: | ||
| + | |||
| + | <div class="mainpage_box"> | ||
| + | [[File:check-moneyorder.jpg|link=|1500px]] | ||
| + | </div> | ||
| + | |||
| + | Disable or remove/uninstall if it is not required. | ||
| + | |||
| + | |||
| + | ---- | ||
| + | ==='''Edit Modules'''=== | ||
| + | *To edit a module, click on the module in the list to select it. | ||
| + | *Click <span class="btn-yellow">Edit</span> | ||
| + | *Enable/Disable module by setting to '''True''' or '''False''' as required or click on the item in the list and click <span class="btn-yellow">Remove Module</span> to remove/uninstall it if required. | ||
| + | *Apply this payment module to a defined Tax Zone by choosing it in the drop down menu below '''Payment Zone''' or leave as '''--none--''' to apply the payment module to all Tax Zones. | ||
| + | *Leave '''Set Order Status''' as '''default''' unless otherwise required. | ||
| + | *Enter a '''Sort Order of display''' value. Do not leave '''0''' as the '''Sort Order''' on modules as it can cause problems. You can give it any number, in this case enter '''10''' so if you decide to install another module it leaves the option of entering a lesser value for the next if required. | ||
| + | *Click <span class="btn-green">Save</span> | ||
| + | |||
| + | |||
| + | ---- | ||
| + | ==='''3rd Party Addons'''=== | ||
| + | |||
| + | There are more Payment Addons available in the Addons Library here; | ||
| + | |||
| + | '''https://phoenixcart.org/forum/app.php/addons/free/payment-21''' | ||
| + | |||
| + | '''https://phoenixcart.org/forum/app.php/addons/commercial/payment-35''' | ||
| + | |||
| + | The most popular payment provider modules, '''Paypal''' and '''Stripe''', are published and provided for FREE by Phoenix Cart Certified Developers. | ||
| + | |||
| + | You can express your thanks and give back by using their Buy Me a Beverage link to donate to them. | ||
| + | |||
| + | |||
| + | ---- | ||
| + | ==='''Payment Icons'''=== | ||
| + | |||
| + | At this step, it is advisable to change the example Payment Icons shown by default in the Footer. | ||
| + | |||
| + | <div class="mainpage_box"> | ||
| + | [[File:payment-icons.png]] | ||
| + | </div> | ||
| + | |||
| + | From admin go to [[File:adminnavbarmod.png|link=]] '''Modules → Content''' | ||
| + | |||
| + | Scroll down the list to find '''Payment Icons''' in the footer_suffix Group. | ||
| + | |||
| + | *To edit the module, click on the module in the list to select it. | ||
| + | *Go to the Font Awesome link (not a clickable link) to find required icon name(s). | ||
| + | *Click <span class="btn-yellow">Edit</span> | ||
| + | *Enter the icon name(s), comma separated, in the '''Icons''' input box. | ||
| + | *Click <span class="btn-green">Save</span> | ||
| + | |||
| + | |||
| + | <!-- | ||
| + | You will need to open an account with a payment provider <u>first</u> before installing their module. | ||
| + | |||
| + | Paypal is commonly used by shop owners and CE Phoenix has a built in integration to make things easier - see <big>'''[[Start|PayPal]]'''</big> for details. | ||
| + | |||
| + | *Click <span class="btn-red">Install Module</span> (the number shown next to this button refers to the number of modules available). | ||
| + | *Click on a module in the list to select it. | ||
| + | *Click <span class="btn-yellow">Install Module</span> | ||
| + | *Enter account credentials as supplied by the payment provider when you open an account. | ||
| + | *Set '''Payment Zone''', '''Set Order Status''' and '''Sort Order of display''' as required. | ||
| + | *Click <span class="btn-green">Save</span> | ||
| + | |||
| + | --> | ||
| + | |||
| + | <hr> | ||
| + | <span class="btn-grey btn-prev">{{#fas:arrow-left}} [[Set_up_Shipping/Packaging|Previous Step]]</span> | ||
| + | <span class="btn-grey btn-next">[[Set_up_Categories|Next Step]] {{#fas:arrow-right}}</span> | ||
<hr> | <hr> | ||
| − | + | {{Pro}} | |
| − | + | {{Forum}} | |
| + | {{Contribute}} | ||
Latest revision as of 10:00, 24 November 2024
From admin go to  Modules → Payment - you will see this:

Cash On Delivery
This is installed by default as an example.
It allows checkout without payment.
It is commonly used by store owners to perform a test checkout.
Disable or remove/uninstall if it is not required.
Check/Money Order
This is installed by default as an example.
It allows checkout without payment for subsequent payment by Check/Money Order.
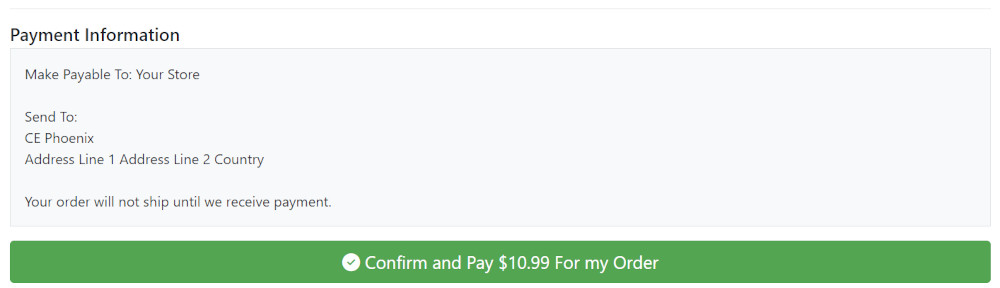
Edit the module to set Make Payable to:
This will add the following section to the Checkout Confirmation (checkout_confirmation.php) page:
Disable or remove/uninstall if it is not required.
Edit Modules
- To edit a module, click on the module in the list to select it.
- Click Edit
- Enable/Disable module by setting to True or False as required or click on the item in the list and click Remove Module to remove/uninstall it if required.
- Apply this payment module to a defined Tax Zone by choosing it in the drop down menu below Payment Zone or leave as --none-- to apply the payment module to all Tax Zones.
- Leave Set Order Status as default unless otherwise required.
- Enter a Sort Order of display value. Do not leave 0 as the Sort Order on modules as it can cause problems. You can give it any number, in this case enter 10 so if you decide to install another module it leaves the option of entering a lesser value for the next if required.
- Click Save
3rd Party Addons
There are more Payment Addons available in the Addons Library here;
https://phoenixcart.org/forum/app.php/addons/free/payment-21
https://phoenixcart.org/forum/app.php/addons/commercial/payment-35
The most popular payment provider modules, Paypal and Stripe, are published and provided for FREE by Phoenix Cart Certified Developers.
You can express your thanks and give back by using their Buy Me a Beverage link to donate to them.
Payment Icons
At this step, it is advisable to change the example Payment Icons shown by default in the Footer.

From admin go to Modules → Content
Scroll down the list to find Payment Icons in the footer_suffix Group.
- To edit the module, click on the module in the list to select it.
- Go to the Font Awesome link (not a clickable link) to find required icon name(s).
- Click Edit
- Enter the icon name(s), comma separated, in the Icons input box.
- Click Save
Many Addons and Extensions available in the CE Phoenix Cart Addons Library
If help is needed, support is available in the CE Phoenix Cart Support Forum
Phoenix Cart User Guide, like CE Phoenix Cart, is free to use but is maintained by unpaid volunteers.
All other content is the reserved Intellectual Property and Copyright of phoenixcart.org
