Difference between revisions of "Set up Products"
From Phoenix Cart User Guide
PeterRobert (talk | contribs) |
PeterRobert (talk | contribs) |
||
| (42 intermediate revisions by the same user not shown) | |||
| Line 1: | Line 1: | ||
| − | < | + | <div class="btn btn-grey btn-back">{{#fas:arrow-left}} Back</div> <div class="btn btn-grey btn-setup-shop">{{#fas:play-square}} [[Set_Up_Store|Set Up Store]]</div> |
| − | < | ||
<hr> | <hr> | ||
| − | + | __TOC__ | |
| − | *From admin go to '''Catalog → Categories/Products''' | + | __FORCETOC__ |
| − | + | *From admin go to [[File:adminnavbarcatalog.png|link=]] '''Catalog → Categories/Products''' | |
| + | ==='''Add Product'''=== | ||
*Click on a category in the list to select it. | *Click on a category in the list to select it. | ||
*Click on it again to open it. | *Click on it again to open it. | ||
| − | *Click <span class="btn- | + | *Click <span class="btn-red">New Product</span> to see this (it is split into 3 tabbed sections, opens showing '''Product specific'''): |
<div class="mainpage_box"> | <div class="mainpage_box"> | ||
[[File:Newproduct1.jpg|link=|1500px]] | [[File:Newproduct1.jpg|link=|1500px]] | ||
</div> | </div> | ||
| − | + | ==='''Product specific'''=== | |
*'''Product Status:''' | *'''Product Status:''' | ||
| − | **This can be changed to hide the product in the | + | **This can be changed to hide the product in the store, when Out of Stock, for example. |
| + | **Note that if customers cannot see it, neither will the internet search engines. | ||
*'''Date Available:''' | *'''Date Available:''' | ||
| − | ** | + | **It might be preferable, if Out of Stock, to enter a date when more stock expected here, using the calendar icon date picker. |
*'''Products Manufacturer:''' | *'''Products Manufacturer:''' | ||
| − | **If you require products to be assigned a manufacturer go to '''Catalog → Manufacturers''' first to enter manufacturers names | + | **If you require products to be assigned a manufacturer go to '''Catalog → Manufacturers''' first to enter manufacturers names. |
| − | |||
| − | |||
| − | |||
| − | |||
*'''Tax Class:''' | *'''Tax Class:''' | ||
**Choose a tax class from the drop down menu. | **Choose a tax class from the drop down menu. | ||
| Line 28: | Line 25: | ||
*'''Products Price (Gross):''' | *'''Products Price (Gross):''' | ||
**Enter a tax inclusive (gross) price here and the tax exclusive (net) price will automatically show. | **Enter a tax inclusive (gross) price here and the tax exclusive (net) price will automatically show. | ||
| − | *'''Products | + | *'''Products Quantity:''' |
| − | **Enter | + | **Enter a stock quantity on hand. |
| + | *'''Products Model:''' | ||
| + | **Enter a model number if you require, it can be used for any identifier you want - the Model Number module '''Modules → Content''' needs to be installed for this to show on product page. | ||
| + | *'''Products Weight:''' | ||
| + | **Enter a weight value for calculating the shipping cost. | ||
| + | *'''Products GTIN:''' | ||
| + | **Enter a GTIN if required. | ||
| + | **The GTIN module '''Modules → Content''' needs to be installed for this to show on product page. | ||
| + | |||
<hr> | <hr> | ||
| + | ==='''Language specific'''=== | ||
| + | *Click <span style="color:#007bff;">Language specific</span> tab and you will see this | ||
<div class="mainpage_box"> | <div class="mainpage_box"> | ||
[[File:Newproduct2.jpg|link=|1500px]] | [[File:Newproduct2.jpg|link=|1500px]] | ||
</div> | </div> | ||
| − | * | + | |
| − | ** | + | *<span class="btn-info">English</span> |
| − | *'''Products | + | **Languages are flagged for each language installed. |
| − | **Enter | + | *'''Products Name:''' |
| − | *'''Products | + | **Enter your product name. |
| − | **Enter | + | *'''Products Description:''' |
| − | + | **Enter your product description - be as detailed as you require. Text can be styled how you wish by using HTML markup. At its simplest, to create a paragraph with a line break, enclose your text with '''<nowiki><p> </p></nowiki>''' e.g. '''<nowiki><p>your text.</p></nowiki>''' or to create a line break type '''<nowiki><br></nowiki>''' e.g. '''<nowiki>your text.<br></nowiki>''' | |
| − | + | **Read more about HTML here - <big>'''[[Simple HTML to Format Text]]'''</big> | |
*'''Products URL:''' | *'''Products URL:''' | ||
**Enter a web site address if required e.g. for the manufacturer. | **Enter a web site address if required e.g. for the manufacturer. | ||
| − | *'''Products | + | **A 3rd Party Addon needs to be installed for this to show on product page (search Addons Library: '''[https://phoenixcart.org/forum/app.php/addons/find-contribution/results?keywords=Products+URL+Link Products URL Link]''' |
| − | ** | + | *'''Products Title for SEO:''' |
| + | **The Products Model will show in the breadcrumb by default - enter the Products Name here if you wish that to show there instead. | ||
*'''Product Meta Description for SEO:''' | *'''Product Meta Description for SEO:''' | ||
| − | ** | + | **Think of this as a short description of less than 30 words. This will show on search engine results pages (SERPs). |
| − | *'''Product | + | *'''Product Keywords''' |
| − | **Enter, | + | **The keywords can be thought of as what a person would type into the store search box to find your product. |
| + | |||
| + | <hr> | ||
| + | |||
| + | ==='''Product images'''=== | ||
| + | *Click <span style="color:#007bff;">Product images</span> tab and you will see this | ||
| + | <div class="mainpage_box"> | ||
| + | [[File:Newproduct3.jpg|link=|1500px]] | ||
| + | </div> | ||
| + | |||
| + | *'''Main Image:''' | ||
| + | **Click <span class="btn-grey>Browse</span> to choose and upload an image from your computer. | ||
| + | *'''Gallery Images''' | ||
| + | **Click <span class="btn-info">Add New Gallery Image</span> to see this: | ||
| + | <div class="mainpage_box"> | ||
| + | [[File:Newproduct3-1.jpg|link=|1500px]] | ||
| + | </div> | ||
| + | *Enter more images if you require more than one. | ||
| + | **Click <span class="btn-grey>Browse</span> to choose and upload an additional image from your computer. | ||
| + | **It is advisable to use a system for naming image files e.g. so the names relate to the product, names are not duplicated and you can identify them. | ||
| + | **Input text and/or HTML to the '''HTML Content''' box to add a caption to the additional images. | ||
| + | **If more than one additional image is added, click on the vertical double arrow icon to drag and drop images to change their order of display if required. | ||
| + | **Click the Red Trash Icon to delete any additional image. | ||
| + | **Click <span class="btn-green">Save</span> | ||
| + | |||
| + | |||
| + | When the product image is clicked on the product page, a sliding carousel, that will cycle through all the images, will pop up like this: | ||
| + | <div class="mainpage_box"> | ||
| + | [[File:Newproduct5.jpg|link=|1500px]] | ||
| + | </div> | ||
| + | |||
| + | ---- | ||
| + | ==='''Digital Products'''=== | ||
| − | |||
If digital downloads are being sold - see <big>'''[[Download]]'''</big> | If digital downloads are being sold - see <big>'''[[Download]]'''</big> | ||
---- | ---- | ||
| − | <span class="btn-grey">[[Set_up_Categories| | + | Read more about Search Engine Optimisation here - <big>'''[[Search Engine Optimisation]]'''</big> |
| − | <span class="btn-grey">[[Set_up_Product_Options_and_Attributes|Next Step | + | |
| + | ---- | ||
| + | <span class="btn-grey btn-prev">{{#fas:arrow-left}} [[Set_up_Categories|Previous Step]]</span> | ||
| + | <span class="btn-grey btn-next">[[Set_up_Product_Options_and_Attributes|Next Step]] {{#fas:arrow-right}}</span> | ||
<hr> | <hr> | ||
| − | {{ | + | {{Pro}} |
| + | {{Forum}} | ||
{{Contribute}} | {{Contribute}} | ||
Latest revision as of 08:30, 6 September 2024
Back
- From admin go to
 Catalog → Categories/Products
Add Product
- Click on a category in the list to select it.
- Click on it again to open it.
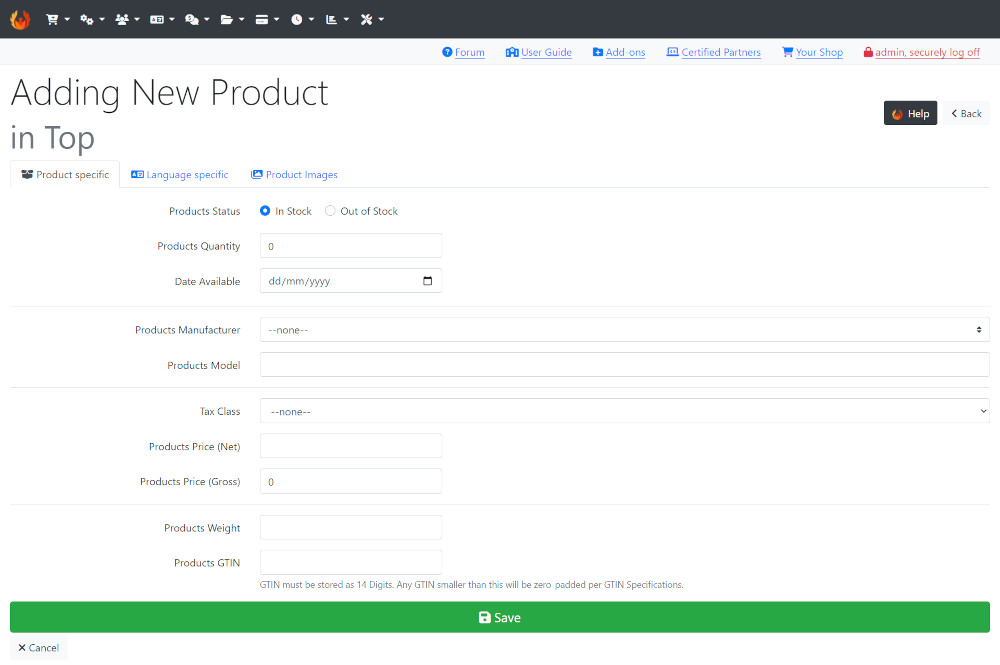
- Click New Product to see this (it is split into 3 tabbed sections, opens showing Product specific):
Product specific
- Product Status:
- This can be changed to hide the product in the store, when Out of Stock, for example.
- Note that if customers cannot see it, neither will the internet search engines.
- Date Available:
- It might be preferable, if Out of Stock, to enter a date when more stock expected here, using the calendar icon date picker.
- Products Manufacturer:
- If you require products to be assigned a manufacturer go to Catalog → Manufacturers first to enter manufacturers names.
- Tax Class:
- Choose a tax class from the drop down menu.
- Products Price (Net):
- Enter a tax exclusive (net) price here and the tax inclusive (gross) price will automatically show.
- Products Price (Gross):
- Enter a tax inclusive (gross) price here and the tax exclusive (net) price will automatically show.
- Products Quantity:
- Enter a stock quantity on hand.
- Products Model:
- Enter a model number if you require, it can be used for any identifier you want - the Model Number module Modules → Content needs to be installed for this to show on product page.
- Products Weight:
- Enter a weight value for calculating the shipping cost.
- Products GTIN:
- Enter a GTIN if required.
- The GTIN module Modules → Content needs to be installed for this to show on product page.
Language specific
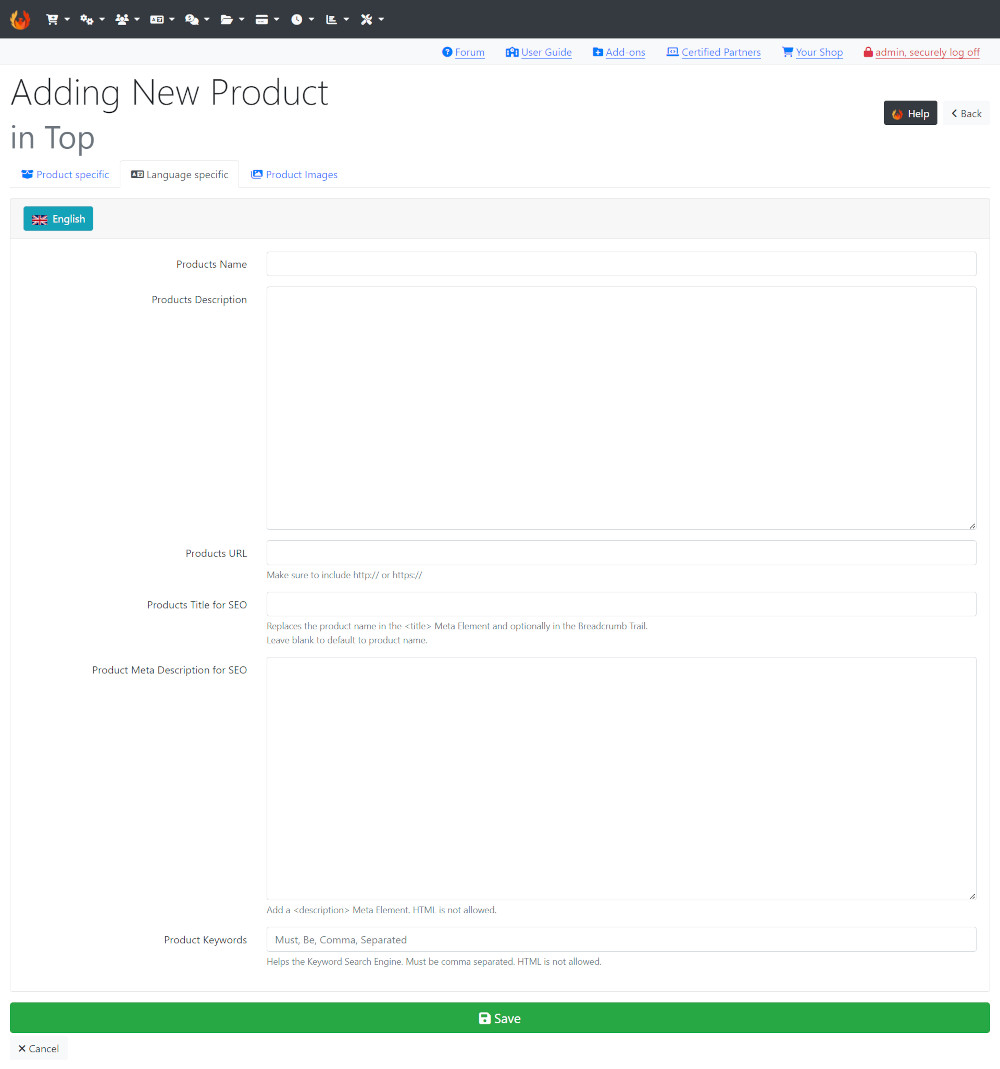
- Click Language specific tab and you will see this
- English
- Languages are flagged for each language installed.
- Products Name:
- Enter your product name.
- Products Description:
- Enter your product description - be as detailed as you require. Text can be styled how you wish by using HTML markup. At its simplest, to create a paragraph with a line break, enclose your text with <p> </p> e.g. <p>your text.</p> or to create a line break type <br> e.g. your text.<br>
- Read more about HTML here - Simple HTML to Format Text
- Products URL:
- Enter a web site address if required e.g. for the manufacturer.
- A 3rd Party Addon needs to be installed for this to show on product page (search Addons Library: Products URL Link
- Products Title for SEO:
- The Products Model will show in the breadcrumb by default - enter the Products Name here if you wish that to show there instead.
- Product Meta Description for SEO:
- Think of this as a short description of less than 30 words. This will show on search engine results pages (SERPs).
- Product Keywords
- The keywords can be thought of as what a person would type into the store search box to find your product.
Product images
- Click Product images tab and you will see this
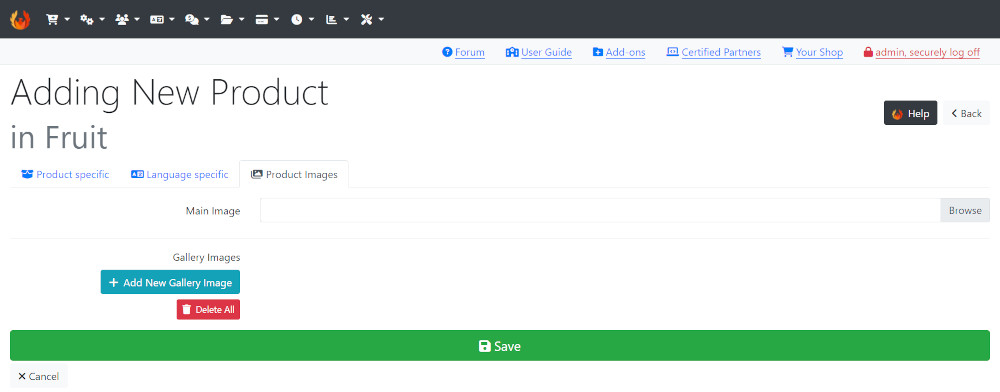
- Main Image:
- Click Browse to choose and upload an image from your computer.
- Gallery Images
- Click Add New Gallery Image to see this:
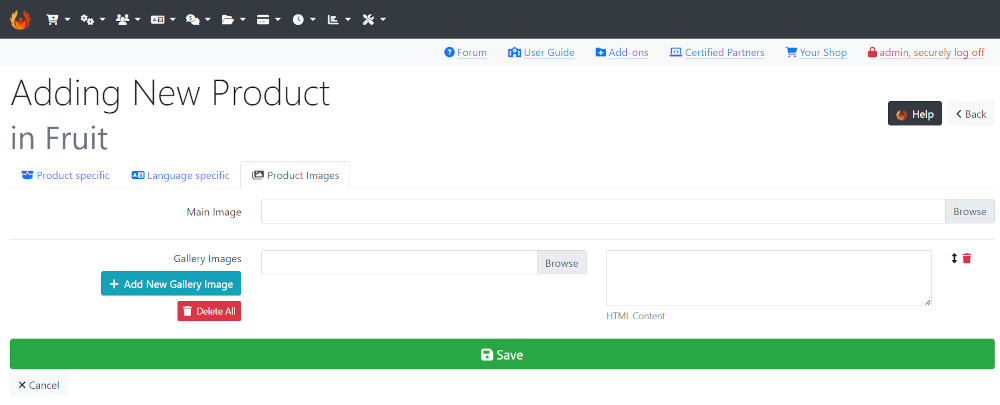
- Enter more images if you require more than one.
- Click Browse to choose and upload an additional image from your computer.
- It is advisable to use a system for naming image files e.g. so the names relate to the product, names are not duplicated and you can identify them.
- Input text and/or HTML to the HTML Content box to add a caption to the additional images.
- If more than one additional image is added, click on the vertical double arrow icon to drag and drop images to change their order of display if required.
- Click the Red Trash Icon to delete any additional image.
- Click Save
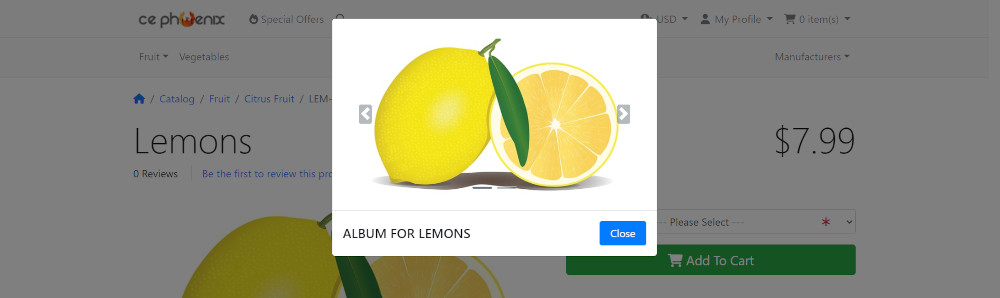
When the product image is clicked on the product page, a sliding carousel, that will cycle through all the images, will pop up like this:
Digital Products
If digital downloads are being sold - see Download
Read more about Search Engine Optimisation here - Search Engine Optimisation
Many Addons and Extensions available in the CE Phoenix Cart Addons Library
If help is needed, support is available in the CE Phoenix Cart Support Forum
Phoenix Cart User Guide, like CE Phoenix Cart, is free to use but is maintained by unpaid volunteers.
All other content is the reserved Intellectual Property and Copyright of phoenixcart.org
