Difference between revisions of "Set up Categories"
PeterRobert (talk | contribs) |
PeterRobert (talk | contribs) |
||
| (55 intermediate revisions by the same user not shown) | |||
| Line 1: | Line 1: | ||
| − | < | + | <div class="btn btn-grey btn-back">{{#fas:arrow-left}} Back</div> <div class="btn btn-grey btn-setup-shop">{{#fas:play-square}} [[Set_Up_Store|Set Up Store]]</div> |
| − | < | ||
<hr> | <hr> | ||
| − | + | __TOC__ | |
| + | __FORCETOC__ | ||
| + | ==='''Store Planning'''=== | ||
| + | It is best to have a clear plan of your store organisation and hierarchy of categories, subcategories and products before starting. | ||
| − | It is | + | Give thought to the naming from the perspective of your customers and what they will be searching for so they will find navigation and therefore find your products easily. It is worth noting that it is difficult for customers to scan long lists and will also notice the first and last items most. Therefore, limit the number of top level categories as much as possible. Ideally a maximum of 7-10 works well. |
| − | + | Categories can contain subcategories or products but not both (although developers can make Phoenix Cart do anything). | |
| − | + | Sub-categories can have more subcategories and so on to create a category tree. | |
| − | + | You will also need pictures for your categories and products, optimised for viewing on the internet. This means they need to have a small file size so they do not take up too much memory or take too long to load, while still being of a quality good enough for viewing. They should also all have the same aspect ratio. | |
| + | See - <big>'''[[GIMP]]'''</big> | ||
| − | |||
| − | |||
| − | |||
| − | + | ---- | |
| + | ==='''Delete Sample Data'''=== | ||
| + | From admin go to [[File:adminnavbarcatalog.png|link=]] '''Catalog → Categories/Products''' | ||
| − | [[File:categoriesproducts. | + | If you chose to include sample data when you installed CE Phoenix Cart you will see this. |
| + | <div class="mainpage_box"> | ||
| + | [[File:categoriesproducts.jpg|link=|1500px]] | ||
| + | </div> | ||
| + | The sample categories, subcategories and products should be deleted. | ||
| + | *Click the folder icon for a category to open it to show the subcategories or products it contains. | ||
| + | *Repeat for subcategories if the category contains them. | ||
| + | *Click on a product in the list. | ||
| + | *Click <span class="btn-red">Delete</span> | ||
| + | *Repeat for each product. | ||
| + | *Click <span class="btn-grey">Back</span> | ||
| + | *Click on the category/subcategory in the list. | ||
| + | *Click <span class="btn-red">Delete</span> | ||
| + | *Repeat until all categories, subcategories and products have been deleted. | ||
| − | |||
| − | |||
<hr> | <hr> | ||
| − | <big>''' | + | ==='''New Categories & Subcategories'''=== |
| + | Click <span class="btn-red">New Category</span> - you will see this: | ||
| + | <div class="mainpage_box"> | ||
| + | [[File:category-new.jpg|link=|1500px]] | ||
| + | </div> | ||
| + | *'''Category Name''' | ||
| + | **Enter the name. | ||
| + | *'''Category Title for SEO''' | ||
| + | **Leave blank or enter something different to the category name if required. | ||
| + | *'''Category Description''' | ||
| + | **Enter a description to show on the category page. Text can be styled how you wish by using HTML markup. At its simplest, to create a paragraph with a line break, enclose your text with '''<nowiki><p> </p></nowiki>''' e.g. '''<nowiki><p>your text.</p></nowiki>''' or to create a line break type '''<nowiki><br></nowiki>''' e.g. '''<nowiki>your text.<br></nowiki>''' | ||
| + | **Read more about HTML here - <big>'''[[Simple HTML to Format Text]]'''</big> | ||
| − | Click <span class="btn- | + | *'''Category Meta Description for SEO''' |
| + | **Think of this as a short description of less than 30 words. | ||
| + | *'''Category Image''' | ||
| + | **Click <span class="btn-grey">Browse</span> to choose and upload an image from your computer. | ||
| + | *'''Sort Order''' | ||
| + | **Enter a sort order value to order your categories. | ||
| + | *Click <span class="btn-green">Save</span> | ||
| − | |||
| − | + | Click the folder icon for a category or subcategory to open it and repeat as above to add new subcategories. | |
| − | |||
| − | |||
| − | |||
| − | |||
| − | |||
| − | |||
| − | |||
| + | ---- | ||
| + | Read more about Search Engine Optimisation here - <big>'''[[Search Engine Optimisation]]'''</big> | ||
<hr> | <hr> | ||
| − | <span class="btn-grey">[[ | + | <span class="btn-grey btn-prev">{{#fas:arrow-left}} [[Set_up_Payment_Options|Previous Step]]</span> |
| − | <span class="btn-grey">[[Set up Products|Next Step | + | <span class="btn-grey btn-next">[[Set up Products|Next Step]] {{#fas:arrow-right}}</span> |
| + | <hr> | ||
| + | {{Pro}} | ||
| + | {{Forum}} | ||
| + | {{Contribute}} | ||
Latest revision as of 07:36, 26 September 2024
Store Planning
It is best to have a clear plan of your store organisation and hierarchy of categories, subcategories and products before starting.
Give thought to the naming from the perspective of your customers and what they will be searching for so they will find navigation and therefore find your products easily. It is worth noting that it is difficult for customers to scan long lists and will also notice the first and last items most. Therefore, limit the number of top level categories as much as possible. Ideally a maximum of 7-10 works well.
Categories can contain subcategories or products but not both (although developers can make Phoenix Cart do anything).
Sub-categories can have more subcategories and so on to create a category tree.
You will also need pictures for your categories and products, optimised for viewing on the internet. This means they need to have a small file size so they do not take up too much memory or take too long to load, while still being of a quality good enough for viewing. They should also all have the same aspect ratio. See - GIMP
Delete Sample Data
From admin go to  Catalog → Categories/Products
If you chose to include sample data when you installed CE Phoenix Cart you will see this.
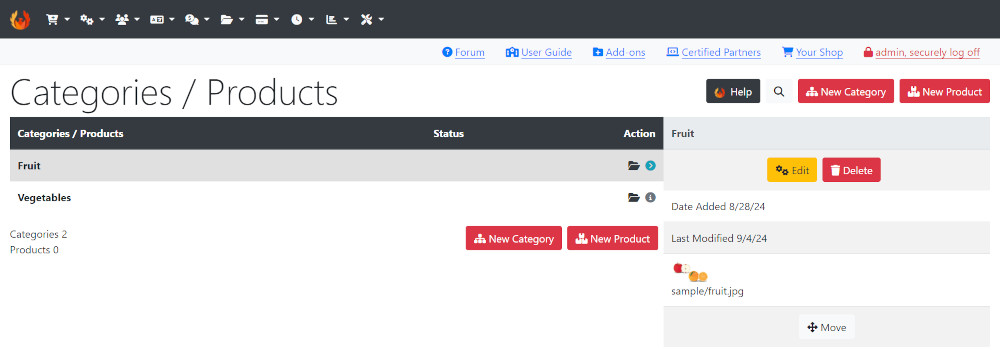
The sample categories, subcategories and products should be deleted.
- Click the folder icon for a category to open it to show the subcategories or products it contains.
- Repeat for subcategories if the category contains them.
- Click on a product in the list.
- Click Delete
- Repeat for each product.
- Click Back
- Click on the category/subcategory in the list.
- Click Delete
- Repeat until all categories, subcategories and products have been deleted.
New Categories & Subcategories
Click New Category - you will see this:
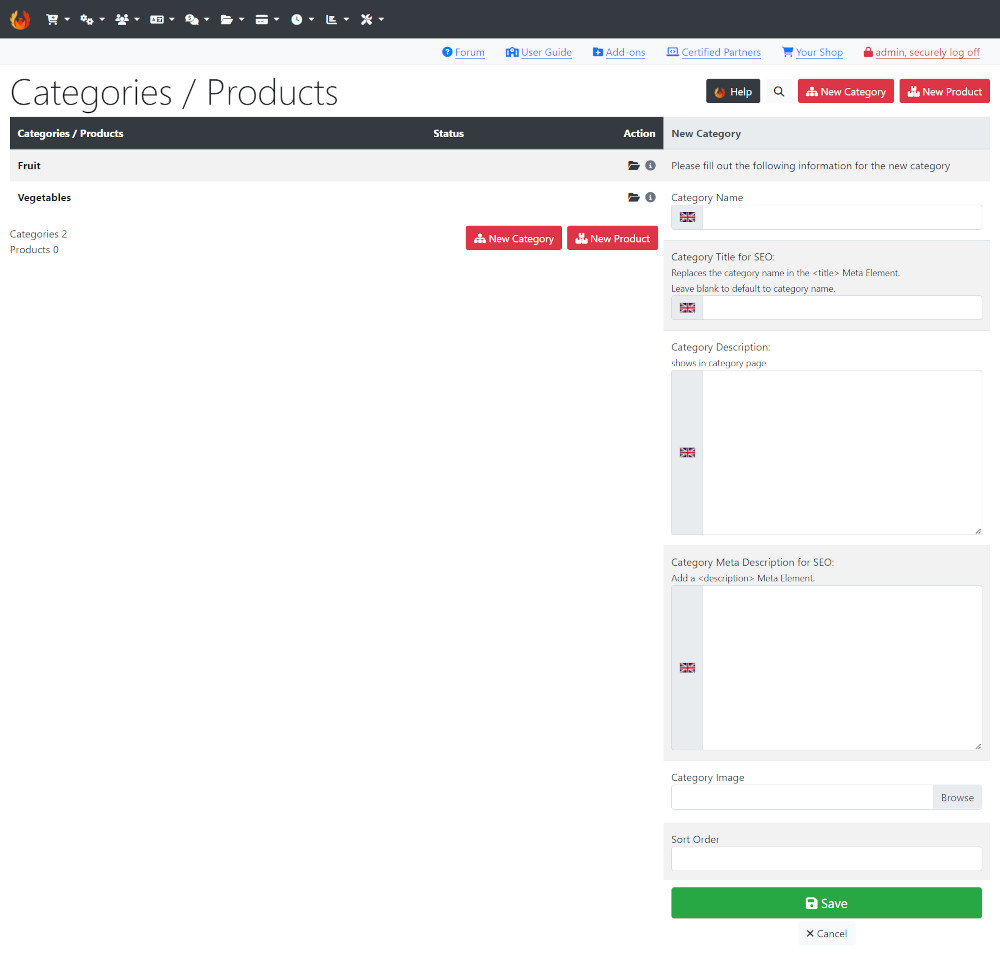
- Category Name
- Enter the name.
- Category Title for SEO
- Leave blank or enter something different to the category name if required.
- Category Description
- Enter a description to show on the category page. Text can be styled how you wish by using HTML markup. At its simplest, to create a paragraph with a line break, enclose your text with <p> </p> e.g. <p>your text.</p> or to create a line break type <br> e.g. your text.<br>
- Read more about HTML here - Simple HTML to Format Text
- Category Meta Description for SEO
- Think of this as a short description of less than 30 words.
- Category Image
- Click Browse to choose and upload an image from your computer.
- Sort Order
- Enter a sort order value to order your categories.
- Click Save
Click the folder icon for a category or subcategory to open it and repeat as above to add new subcategories.
Read more about Search Engine Optimisation here - Search Engine Optimisation
Many Addons and Extensions available in the CE Phoenix Cart Addons Library
If help is needed, support is available in the CE Phoenix Cart Support Forum
Phoenix Cart User Guide, like CE Phoenix Cart, is free to use but is maintained by unpaid volunteers.
All other content is the reserved Intellectual Property and Copyright of phoenixcart.org
